Table of Contents
- Introduction
- Basic CUPS Support Configuration
- Advanced Configuration
- Advanced Intelligent Printing with PostScript Driver Download
- GDI on Windows, PostScript on UNIX
- Windows Drivers, GDI, and EMF
- UNIX Printfile Conversion and GUI Basics
- PostScript and Ghostscript
- Ghostscript: The Software RIP for Non-PostScript Printers
- PostScript Printer Description (PPD) Specification
- Using Windows-Formatted Vendor PPDs
- CUPS Also Uses PPDs for Non-PostScript Printers
- The CUPS Filtering Architecture
- MIME Types and CUPS Filters
- MIME Type Conversion Rules
- Filtering Overview
- Prefilters
- pstops
- pstoraster
- imagetops and imagetoraster
- rasterto [printers specific]
- CUPS Backends
- The Role of cupsomatic/foomatic
- The Complete Picture
- mime.convs
- Raw Printing
- application/octet-stream Printing
- PostScript Printer Descriptions for Non-PostScript Printers
- cupsomatic/foomatic-rip Versus Native CUPS Printing
- Examples for Filtering Chains
- Sources of CUPS Drivers/PPDs
- Printing with Interface Scripts
- Network Printing (Purely Windows)
- Network Printing (Windows Clients and UNIX/Samba Print Servers)
- Network PostScript RIP
- Windows Terminal Servers (WTS) as CUPS Clients
- Configuring CUPS for Driver Download
- cupsaddsmb: The Unknown Utility
- Prepare Your smb.conf for cupsaddsmb
- CUPS PostScript Driver for Windows NT/200x/XP
- Recognizing Different Driver Files
- Acquiring the Adobe Driver Files
- ESP Print Pro PostScript Driver for Windows NT/200x/XP
- Caveats to Be Considered
- Windows CUPS PostScript Driver Versus Adobe Driver
- Run cupsaddsmb (Quiet Mode)
- Run cupsaddsmb with Verbose Output
- Understanding cupsaddsmb
- How to Recognize If cupsaddsmb Completed Successfully
- cupsaddsmb with a Samba PDC
- cupsaddsmb Flowchart
- Installing the PostScript Driver on a Client
- Avoiding Critical PostScript Driver Settings on the Client
- Installing PostScript Driver Files Manually Using rpcclient
- The Printing *.tdb Files
- CUPS Print Drivers from Linuxprinting.org
- Page Accounting with CUPS
- Additional Material
- Autodeletion or Preservation of CUPS Spool Files
- Printing from CUPS to Windows-Attached Printers
- More CUPS Filtering Chains
- Common Errors
- Windows 9x/Me Client Can't Install Driver
- cupsaddsmb Keeps Asking for Root Password in Never-ending Loop
- cupsaddsmb or rpcclient addriver Emit Error
- cupsaddsmb Errors
- Client Can't Connect to Samba Printer
- New Account Reconnection from Windows 200x/XP Troubles
- Avoid Being Connected to the Samba Server as the Wrong User
- Upgrading to CUPS Drivers from Adobe Drivers
- Can't Use cupsaddsmb on Samba Server, Which Is a PDC
- Deleted Windows 200x Printer Driver Is Still Shown
- Windows 200x/XP Local Security Policies
- Administrator Cannot Install Printers for All Local Users
- Print Change, Notify Functions on NT Clients
- Windows XP SP1
- Print Options for All Users Can't Be Set on Windows 200x/XP
- Most Common Blunders in Driver Settings on Windows Clients
- cupsaddsmb Does Not Work with Newly Installed Printer
- Permissions on /var/spool/samba/ Get Reset After Each Reboot
- Print Queue Called lp Mishandles Print Jobs
- Location of Adobe PostScript Driver Files for cupsaddsmb
- Overview of the CUPS Printing Processes
The Common UNIX Print System (CUPS) has become quite popular. All major Linux distributions now ship it as their default printing system. To many, it is still a mystical tool. Mostly, it just works. People tend to regard it as a “black box” that they do not want to look into as long as it works. But once there is a little problem, they have trouble finding out where to start debugging it. Refer to Classical Printing, which contains much information that is also relevant to CUPS.
CUPS sports quite a few unique and powerful features. While its basic functions may be grasped quite easily, they are also new. Because it is different from other, more traditional printing systems, it is best not to try to apply any prior knowledge about printing to this new system. Rather, try to understand CUPS from the beginning. This documentation will lead you to a complete understanding of CUPS. Let's start with the most basic things first.
CUPS is more than just a print spooling system. It is a complete printer management system that complies with the new Internet Printing Protocol (IPP). IPP is an industry and Internet Engineering Task Force (IETF) standard for network printing. Many of its functions can be managed remotely (or locally) via a Web browser (giving you platform-independent access to the CUPS print server). Additionally, it has the traditional command line and several more modern GUI interfaces (GUI interfaces developed by third parties, like KDE's overwhelming KDEPrint).
CUPS allows creation of raw printers (i.e., no print file format translation) as well as smart printers (i.e., CUPS does file format conversion as required for the printer). In many ways, this gives CUPS capabilities similar to the MS Windows print monitoring system. Of course, if you are a CUPS advocate, you would argue that CUPS is better! In any case, let us now explore how to configure CUPS for interfacing with MS Windows print clients via Samba.
Printing with CUPS in the most basic smb.conf setup in Samba-3.0 (as was true for 2.2.x) requires just two
parameters: printing = cups and printcap = cups. CUPS does not need a printcap file. However, the
cupsd.conf configuration file knows of two related directives that control how such a
file will be automatically created and maintained by CUPS for the convenience of third-party applications
(example: Printcap /etc/printcap and PrintcapFormat BSD).
Legacy programs often require the existence of a printcap file containing printer names or they will refuse to
print. Make sure CUPS is set to generate and maintain a printcap file. For details, see man
cupsd.conf and other CUPS-related documentation, like the wealth of documents regarding the CUPS
server itself available from the CUPS web site.
Samba has a special relationship to CUPS. Samba can be compiled with CUPS library support.
Most recent installations have this support enabled. By default, CUPS linking is compiled
into smbd and other Samba binaries. Of course, you can use CUPS even
if Samba is not linked against libcups.so but
there are some differences in required or supported configuration.
When Samba is compiled and linked with libcups, printcap = cups
uses the CUPS API to list printers, submit jobs, query queues, and so on. Otherwise it maps to the System V
commands with an additional -oraw option for printing. On a Linux
system, you can use the ldd utility to find out if smbd has been linked with the
libcups library (ldd may not be present on other OS platforms, or its function may be embodied
by a different command):
root#ldd `which smbd`libssl.so.0.9.6 => /usr/lib/libssl.so.0.9.6 (0x4002d000) libcrypto.so.0.9.6 => /usr/lib/libcrypto.so.0.9.6 (0x4005a000) libcups.so.2 => /usr/lib/libcups.so.2 (0x40123000) [....]
The line libcups.so.2 => /usr/lib/libcups.so.2 (0x40123000) shows
there is CUPS support compiled into this version of Samba. If this is the case, and printing = cups
is set, then any otherwise manually set print command in smb.conf is ignored.
This is an important point to remember!
Tip
Should it be necessary, for any reason, to set your own print commands, you can do this by setting printing = sysv. However, you will lose all the benefits of tight CUPS-Samba integration. When you do this, you must manually configure the printing system commands (most important: print command; other commands are lppause command, lpresume command, lpq command, lprm command, queuepause command and queue resume command).
To summarize, the Simplest Printing-Related
smb.conf file shows the simplest printing-related setup for smb.conf to
enable basic CUPS support:
This is all you need for basic printing setup for CUPS. It will print all graphic, text, PDF, and PostScript files submitted from Windows clients. However, most of your Windows users would not know how to send these kinds of files to print without opening a GUI application. Windows clients tend to have local printer drivers installed, and the GUI application's print buttons start a printer driver. Your users also rarely send files from the command line. Unlike UNIX clients, they rarely submit graphic, text, or PDF formatted files directly to the spooler. They nearly exclusively print from GUI applications with a “printer driver” hooked between the application's native format and the print data stream. If the backend printer is not a PostScript device, the print data stream is “binary,” sensible only for the target printer. Read on to learn what problem this may cause and how to avoid it.
The Overriding Global CUPS Settings for One Printer example
is a slightly more complex printing-related setup for smb.conf. It enables general CUPS printing
support for all printers, but defines one printer share, which is set up differently.
Example 22.2. Overriding Global CUPS Settings for One Printer
This special share is only for testing purposes. It does not write the print job to a file. It just logs the job parameters
known to Samba into the /tmp/smbprn.log file and deletes the job-file. Moreover, the
printer admin of this share is “kurt” (not the “@ntadmins” group),
guest access is not allowed, the share isn't published to the Network Neighborhood (so you need to know it is there), and it
allows access from only three hosts. To prevent CUPS from kicking in and taking over the print jobs for that share, we need to set
printing = sysv and printcap = lpstat.
Before we delve into all the configuration options, let us clarify a few points. Network printing needs to be organized and set up correctly. This frequently doesn't happen. Legacy systems or small business LAN environments often lack design and good housekeeping.
Many small office or home networks, as well as badly organized larger environments, allow each client a direct access to available network printers. This is generally a bad idea. It often blocks one client's access to the printer when another client's job is printing. It might freeze the first client's application while it is waiting to get rid of the job. Also, there are frequent complaints about various jobs being printed with their pages mixed with each other. A better concept is the use of a print server: it routes all jobs through one central system, which responds immediately, takes jobs from multiple concurrent clients, and transfers them to the printer(s) in the correct order.
Most traditionally configured UNIX print servers acting on behalf of Samba's Windows clients represented a really simple setup. Their only task was to manage the “raw” spooling of all jobs handed to them by Samba. This approach meant that the Windows clients were expected to prepare the print job file that is ready to be sent to the printing device. In this case, a native (vendor-supplied) Windows printer driver needs to be installed on each and every client for the target device.
It is possible to configure CUPS, Samba, and your Windows clients in the same traditional and simple way. When CUPS printers are configured for raw print-through mode operation, it is the responsibility of the Samba client to fully render the print job (file). The file must be sent in a format that is suitable for direct delivery to the printer. Clients need to run the vendor-provided drivers to do this. In this case, CUPS will not do any print file format conversion work.
The easiest printing configuration possible is raw print-through. This is achieved by installation of the printer as if it were physically attached to the Windows client. You then redirect output to a raw network print queue. This procedure may be followed to achieve this:
Procedure 22.1. Configuration Steps for Raw CUPS Printing Support
Edit
/etc/cups/mime.typesto uncomment the line near the end of the file that has:#application/octet-...
Add a raw printer using the Web interface. Point your browser at
http://localhost:631. Enter Administration, and add the printer following the prompts. Do not install any drivers for it. Choose Raw. Choose queue nameRaw Queue.In the
smb.conffile[printers]section add use client driver = Yes, and in the[global]section add printing = CUPS, plus printcap = CUPS.Install the printer as if it is a local printer, that is, Printing to
LPT1:.Edit the configuration under the tab and create a
local portthat points to the raw printer queue that you have configured above. Example:\\server\raw_q. Here, the nameraw_qis the name you gave the print queue in the CUPS environment.
The printer drivers on the Windows clients may be installed in two functionally different ways:
Manually install the drivers locally on each client, one by one; this yields the old LanMan style printing and uses a
\\sambaserver\printersharetype of connection.Deposit and prepare the drivers (for later download) on the print server (Samba); this enables the clients to use “Point'n'Print” to get drivers semi-automatically installed the first time they access the printer; with this method NT/200x/XP clients use the SPOOLSS/MS-RPC type printing calls.
The second method is recommended for use over the first as it reduces the administrative efforts and prevents that different versions of the drivers are used accidentally.
If you use the first option (drivers are installed on the client side), there is one setting to take care of: CUPS needs to be told that it should allow “raw” printing of deliberate (binary) file formats. The CUPS files that need to be correctly set for raw mode printers to work are:
/etc/cups/mime.types/etc/cups/mime.convs
Both contain entries (at the end of the respective files) that must be uncommented to allow RAW mode
operation. In /etc/cups/mime.types, make sure this line is present:
application/octet-stream
In /etc/cups/mime.convs, have this line:
application/octet-stream application/vnd.cups-raw 0 -
If these two files are not set up correctly for raw Windows client
printing, you may encounter the dreaded Unable to
convert file 0 in your CUPS error_log file.
Note
Editing the mime.convs and the mime.types file does
not enforce “raw” printing, it only allows it.
Background.
That CUPS is a more security-aware printing system than traditional ones does not by default allow a user to
send deliberate (possibly binary) data to printing devices. This could be easily abused to launch a
“Denial of Service” attack on your printer(s), causing at least the loss of a lot of paper and
ink. “Unknown” data are tagged by CUPS as MIME type: application/octet-stream
and not allowed to go to the printer. By default, you can only send other (known) MIME types “raw.”
Sending data “raw” means that CUPS does not try to convert them and passes them to the printer
untouched.
This is all you need to know to get the CUPS/Samba combo printing “raw” files prepared by Windows clients, which have vendor drivers locally installed. If you are not interested in background information about more advanced CUPS/Samba printing, simply skip the remaining sections of this chapter.
This section describes three familiar methods, plus one new one, by which printer drivers may be uploaded.
If you want to use the MS-RPC-type printing, you must upload the
drivers onto the Samba server first ([print$]
share). For a discussion on how to deposit printer drivers on the
Samba host (so the Windows clients can download and use them via
“Point'n'Print”), please refer to the Classical Printing
chapter of this book. There you will find a description or reference to
three methods of preparing the client drivers on the Samba server:
These three methods apply to CUPS all the same. The cupsaddsmb utility is a new and more
convenient way to load the Windows drivers into Samba and is provided if you use CUPS.
cupsaddsmb is discussed in much detail later in this chapter. But we first
explore the CUPS filtering system and compare the Windows and UNIX printing architectures.
We now know how to set up a “dump” print server, that is, a server that spools print jobs “raw”, leaving the print data untouched.
You might need to set up CUPS in a smarter way. The reasons could be manifold:
Maybe your boss wants to get monthly statistics: Which printer did how many pages? What was the average data size of a job? What was the average print run per day? What are the typical hourly peaks in printing? Which department prints how much?
Maybe you are asked to set up a print quota system: Users should not be able to print more jobs once they have surpassed a given limit per period.
Maybe your previous network printing setup is a mess and must be re-organized from a clean beginning.
Maybe you are experiencing too many “blue screens” originating from poorly debugged printer drivers running in NT “kernel mode”?
These goals cannot be achieved by a raw print server. To build a server meeting these requirements, you'll first need to learn how CUPS works and how you can enable its features.
What follows is the comparison of some fundamental concepts for Windows and UNIX printing, then a description of the CUPS filtering system, how it works, and how you can tweak it.
Network printing is one of the most complicated and error-prone day-to-day tasks any user or administrator may encounter. This is true for all OS platforms, and there are reasons it is so.
You can't expect to throw just any file format at a printer and have it get printed. A file format conversion must take place. The problem is that there is no common standard for print file formats across all manufacturers and printer types. While PostScript (trademark held by Adobe) and, to an extent, PCL (trademark held by Hewlett-Packard) have developed into semi-official “standards” by being the most widely used page description languages (PDLs), there are still many manufacturers who “roll their own” (their reasons may be unacceptable license fees for using printer-embedded PostScript interpreters, and so on).
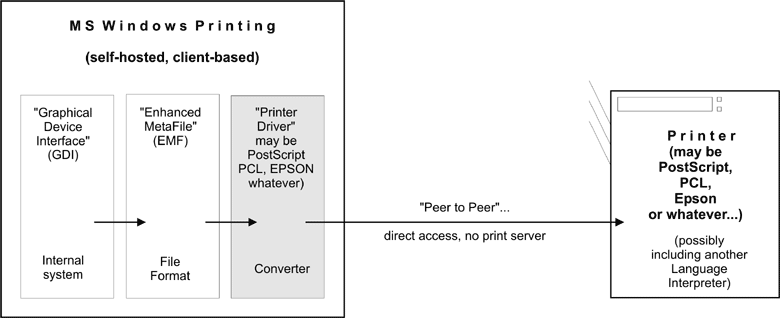
In Windows OS, the format conversion job is done by the printer drivers. On MS Windows OS platforms all application programmers have at their disposal a built-in API, the graphical device interface (GDI), as part and parcel of the OS itself to base themselves on. This GDI core is used as one common unified ground for all Windows programs to draw pictures, fonts, and documents on screen as well as on paper (print). Therefore, printer driver developers can standardize on a well-defined GDI output for their own driver input. Achieving WYSIWYG (What You See Is What You Get) is relatively easy, because the on-screen graphic primitives, as well as the on-paper drawn objects, come from one common source. This source, the GDI, often produces a file format called Enhanced MetaFile (EMF). The EMF is processed by the printer driver and converted to the printer-specific file format.
Note
To the GDI foundation in MS Windows, Apple has chosen to put paper and screen output on a common foundation for its (BSD-UNIX-based, did you know?) Mac OS X and Darwin operating systems. Apple's core graphic engine uses a PDF derivative for all display work.
The example in Windows Printing to a Local Printer illustrates local Windows printing.
In UNIX and Linux, there is no comparable layer built into the OS kernel(s) or the X (screen display) server. Every application is responsible for itself to create its print output. Fortunately, most use PostScript and that at least gives some common ground. Unfortunately, there are many different levels of quality for this PostScript. And worse, there is a huge difference (and no common root) in the way the same document is displayed on screen and how it is presented on paper. WYSIWYG is more difficult to achieve. This goes back to the time, decades ago, when the predecessors of X.org, designing the UNIX foundations and protocols for graphical user interfaces, refused to take responsibility for “paper output”, as some had demanded at the time, and restricted itself to “on-screen only.” (For some years now, the “Xprint” project has been under development, attempting to build printing support into the X framework, including a PostScript and a PCL driver, but it is not yet ready for prime time.) You can see this unfavorable inheritance up to the present day by looking into the various “font” directories on your system; there are separate ones for fonts used for X display and fonts to be used on paper.
Background. The PostScript programming language is an “invention” by Adobe, but its specifications have been published extensively. Its strength lies in its powerful abilities to describe graphical objects (fonts, shapes, patterns, lines, curves, and dots), their attributes (color, linewidth), and the way to manipulate (scale, distort, rotate, shift) them. Because of its open specification, anybody with the skill can start writing his or her own implementation of a PostScript interpreter and use it to display PostScript files on screen or on paper. Most graphical output devices are based on the concept of “raster images” or “pixels” (one notable exception is pen plotters). Of course, you can look at a PostScript file in its textual form and you will be reading its PostScript code, the language instructions that need to be interpreted by a rasterizer. Rasterizers produce pixel images, which may be displayed on screen by a viewer program or on paper by a printer.
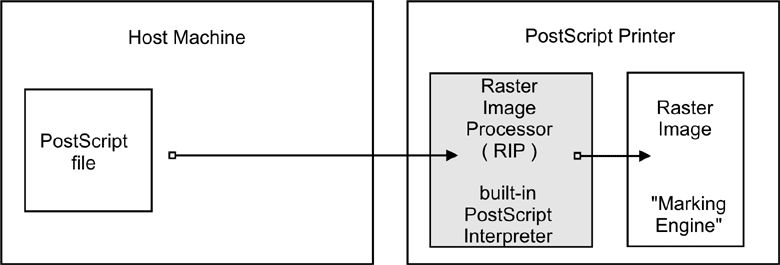
So UNIX is lacking a common ground for printing on paper and displaying on screen. Despite this unfavorable legacy for UNIX, basic printing is fairly easy if you have PostScript printers at your disposal. The reason is that these devices have a built-in PostScript language “interpreter,” also called a raster image processor (RIP), (which makes them more expensive than other types of printers; throw PostScript toward them, and they will spit out your printed pages. The RIP does all the hard work of converting the PostScript drawing commands into a bitmap picture as you see it on paper, in a resolution as done by your printer. This is no different than PostScript printing a file from a Windows origin.
Note
Traditional UNIX programs and printing systems while using PostScript are largely not PPD-aware. PPDs are “PostScript Printer Description” files. They enable you to specify and control all options a printer supports: duplexing, stapling, and punching. Therefore, UNIX users for a long time couldn't choose many of the supported device and job options, unlike Windows or Apple users. But now there is CUPS. as illustrated in Printing to a PostScript Printer.
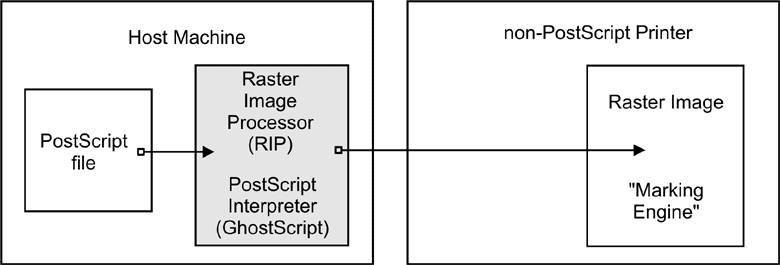
However, there are other types of printers out there. These do not know how to print PostScript. They use their own PDL, often proprietary. To print to them is much more demanding. Since your UNIX applications mostly produce PostScript, and since these devices do not understand PostScript, you need to convert the print files to a format suitable for your printer on the host before you can send it away.
Here is where Ghostscript kicks in. Ghostscript is the traditional (and quite powerful) PostScript interpreter used on UNIX platforms. It is a RIP in software, capable of doing a lot of file format conversions for a very broad spectrum of hardware devices as well as software file formats. Ghostscript technology and drivers are what enable PostScript printing to non-PostScript hardware. This is shown in Ghostscript as a RIP for Non-PostScript Printers.
Tip
Use the “gs -h” command to check for all built-in “devices” on your Ghostscript
version. If you specify a parameter of -sDEVICE=png256 on your Ghostscript command
line, you are asking Ghostscript to convert the input into a PNG file. Naming a “device” on the
command line is the most important single parameter to tell Ghostscript exactly how it should render the
input. New Ghostscript versions are released at fairly regular intervals, now by artofcode LLC. They are
initially put under the “AFPL” license, but re-released under the GNU GPL as soon as the next
AFPL version appears. GNU Ghostscript is probably the version installed on most Samba systems. But it has some
deficiencies. Therefore, ESP Ghostscript was developed as an enhancement over GNU Ghostscript,
with lots of bug-fixes, additional devices, and improvements. It is jointly maintained by developers from
CUPS, Gutenprint, MandrakeSoft, SuSE, Red Hat, and Debian. It includes the “cups” device
(essential to print to non-PS printers from CUPS).
While PostScript in essence is a PDL to represent the page layout in a device-independent way, real-world print jobs are always ending up being output on hardware with device-specific features. To take care of all the differences in hardware and to allow for innovations, Adobe has specified a syntax and file format for PostScript Printer Description (PPD) files. Every PostScript printer ships with one of these files.
PPDs contain all the information about general and special features of the given printer model: Which different resolutions can it handle? Does it have a duplexing unit? How many paper trays are there? What media types and sizes does it take? For each item, it also names the special command string to be sent to the printer (mostly inside the PostScript file) in order to enable it.
Information from these PPDs is meant to be taken into account by the printer drivers. Therefore, installed as part of the Windows PostScript driver for a given printer is the printer's PPD. Where it makes sense, the PPD features are presented in the drivers' UI dialogs to display to the user a choice of print options. In the end, the user selections are somehow written (in the form of special PostScript, PJL, JCL, or vendor-dependent commands) into the PostScript file created by the driver.
Warning
A PostScript file that was created to contain device-specific commands for achieving a certain print job output (e.g., duplexed, stapled, and punched) on a specific target machine may not print as expected, or may not be printable at all on other models; it also may not be fit for further processing by software (e.g., by a PDF distilling program).
CUPS can handle all spec-compliant PPDs as supplied by the manufacturers for their PostScript models. Even if a vendor does not mention our favorite OS in his or her manuals and brochures, you can safely trust this: If you get the Windows NT version of the PPD, you can use it unchanged in CUPS and thus access the full power of your printer just like a Windows NT user could!
Tip
To check the spec compliance of any PPD online, go to http://www.cups.org/testppd.php and upload your PPD. You will see the results displayed immediately. CUPS in all versions after 1.1.19 has a much stricter internal PPD parsing and checking code enabled; in case of printing trouble, this online resource should be one of your first pit stops.
Warning
For real PostScript printers, do not use the Foomatic or cupsomatic PPDs from Linuxprinting.org. With these devices, the original vendor-provided PPDs are always the first choice.
Tip
If you are looking for an original vendor-provided PPD of a specific device, and you know that an NT4 box (or
any other Windows box) on your LAN has the PostScript driver installed, just use smbclient
//NT4-box/print\$ -U username to access the Windows directory where all printer driver files are
stored. First look in the W32X86/2 subdirectory for the PPD you are seeking.
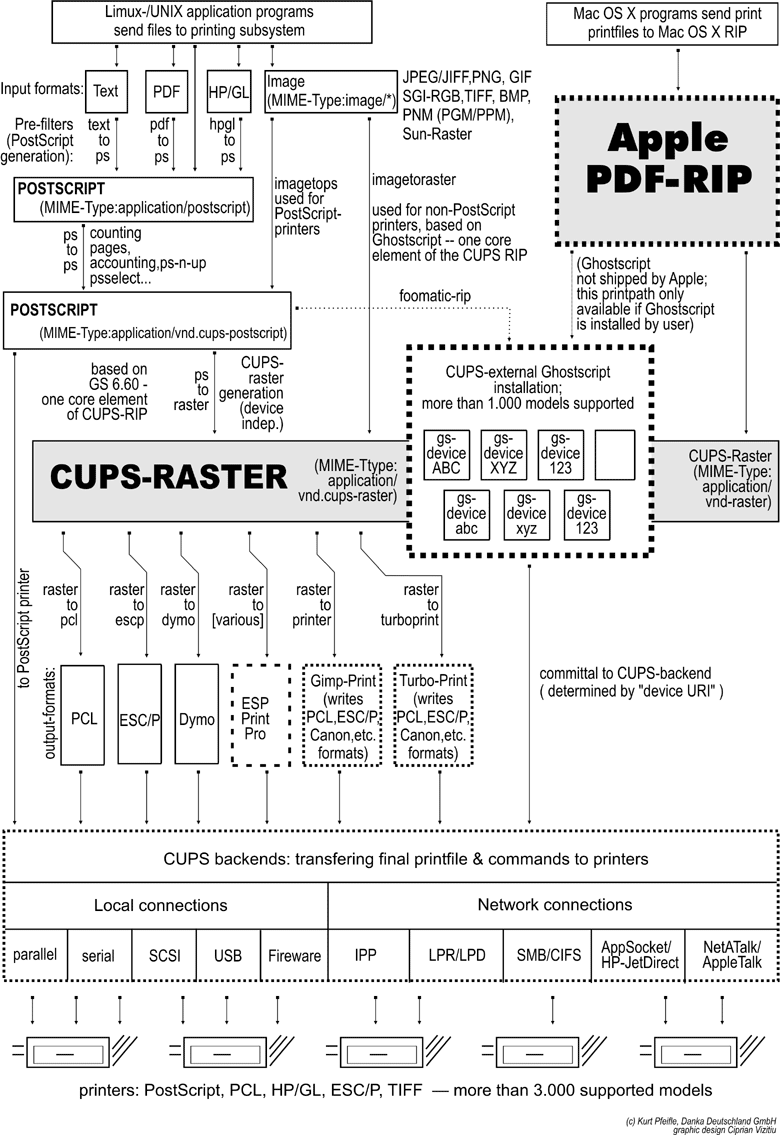
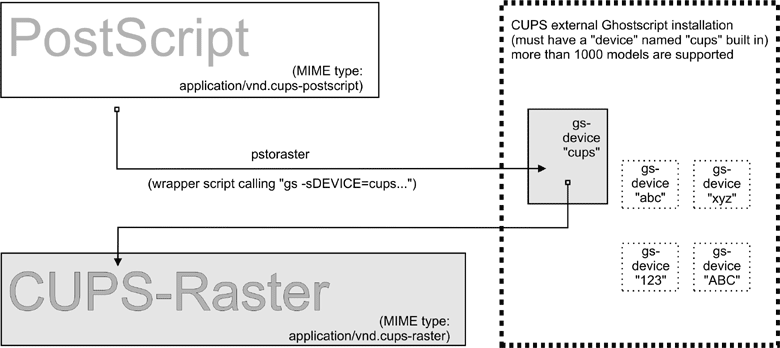
CUPS also uses specially crafted PPDs to handle non-PostScript printers. These PPDs are usually not available from the vendors (and no, you can't just take the PPD of a PostScript printer with the same model name and hope it works for the non-PostScript version too). To understand how these PPDs work for non-PS printers, we first need to dive deeply into the CUPS filtering and file format conversion architecture. Stay tuned.
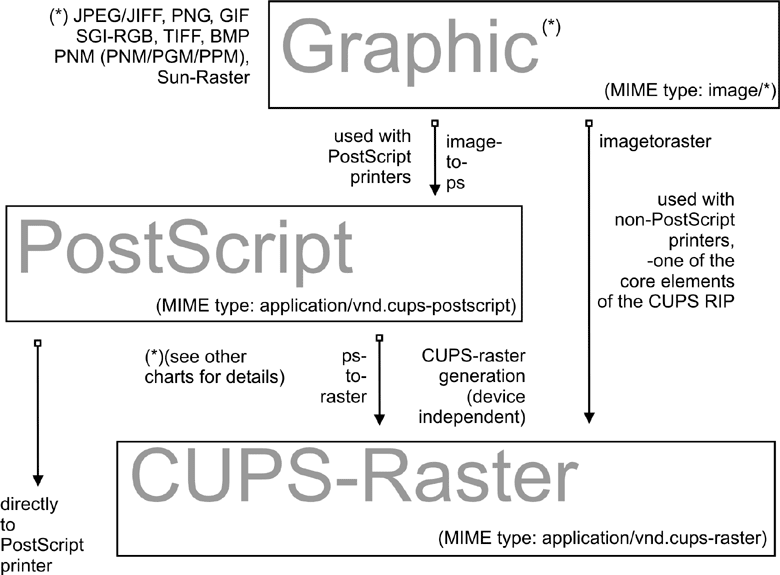
The core of the CUPS filtering system is based on Ghostscript. In addition to Ghostscript, CUPS uses some other filters of its own. You (or your OS vendor) may have plugged in even more filters. CUPS handles all data file formats under the label of various MIME types. Every incoming print file is subjected to an initial autotyping. The autotyping determines its given MIME type. A given MIME type implies zero or more possible filtering chains relevant to the selected target printer. This section discusses how MIME types recognition and conversion rules interact. They are used by CUPS to automatically set up a working filtering chain for any given input data format.
If CUPS rasterizes a PostScript file natively to a bitmap, this is done in two stages:
Make sure your Ghostscript version has the “cups” device compiled in (check with gs -h |
grep cups). Otherwise you may encounter the dreaded Unable to convert file
0 in your CUPS error_log file. To have “cups” as a device in your Ghostscript,
you either need to patch GNU Ghostscript and recompile or use
ESP Ghostscript. The superior alternative is ESP
Ghostscript. It supports not just CUPS, but 300 other devices (while GNU Ghostscript supports only about 180).
Because of this broad output device support, ESP Ghostscript is the first choice for non-CUPS spoolers, too.
It is now recommended by Linuxprinting.org for all spoolers.
CUPS printers may be set up to use external rendering paths. One of the most common is provided by the Foomatic/cupsomatic concept from Linuxprinting.org. This uses the classical Ghostscript approach, doing everything in one step. It does not use the “cups” device, but one of the many others. However, even for Foomatic/cupsomatic usage, best results and broadest printer model support is provided by ESP Ghostscript (more about Foomatic/cupsomatic, particularly the new version called now foomatic-rip, follows).
CUPS reads the file /etc/cups/mime.types (and all other files carrying a
*.types suffix in the same directory) upon startup. These files contain the MIME type
recognition rules that are applied when CUPS runs its autotyping routines. The rule syntax is explained in the
man page for mime.types and in the comments section of the
mime.types file itself. A simple rule reads like this:
application/pdf pdf string(0,%PDF)
This means if a filename has a .pdf suffix or if the magic string
%PDF is right at the beginning of the file itself (offset 0 from the start), then it is a
PDF file (application/pdf). Another rule is this:
application/postscript ai eps ps string(0,%!) string(0,<04>%!)
If the filename has one of the suffixes .ai, .eps,
.ps, or if the file itself starts with one of the strings %! or
<04>%!, it is a generic PostScript file
(application/postscript).
Warning
Don't confuse the other mime.types files your system might be using
with the one in the /etc/cups/ directory.
Note
There is an important difference between two similar MIME types in CUPS: one is
application/postscript, the other is
application/vnd.cups-postscript. While application/postscript is
meant to be device-independent, job options for the file are still outside the PS file content, embedded in
command line or environment variables by CUPS, application/vnd.cups-postscript may have
the job options inserted into the PostScript data itself (where applicable). The transformation of the generic
PostScript (application/postscript) to the device-specific version
(application/vnd.cups-postscript) is the responsibility of the CUPS
pstops filter. pstops uses information contained in the PPD to do the transformation.
CUPS can handle ASCII text, HP-GL, PDF, PostScript, DVI, and many image formats (GIF, PNG, TIFF, JPEG, Photo-CD, SUN-Raster, PNM, PBM, SGI-RGB, and more) and their associated MIME types with its filters.
CUPS reads the file /etc/cups/mime.convs
(and all other files named with a *.convs
suffix in the same directory) upon startup. These files contain
lines naming an input MIME type, an output MIME type, a format
conversion filter that can produce the output from the input type,
and virtual costs associated with this conversion. One example line
reads like this:
application/pdf application/postscript 33 pdftops
This means that the pdftops filter will take
application/pdf as input and produce
application/postscript as output; the virtual
cost of this operation is 33 CUPS-$. The next filter is more
expensive, costing 66 CUPS-$:
application/vnd.hp-HPGL application/postscript 66 hpgltops
This is the hpgltops, which processes HP-GL
plotter files to PostScript.
application/octet-stream
application/x-shell application/postscript 33 texttops text/plain application/postscript 33 texttops
The last two examples name the texttops filter to work on
text/plain as well as on application/x-shell. (Hint: This
differentiation is needed for the syntax highlighting feature of texttops).
There are many more combinations named in mime.convs. However, you are not limited to use
the ones predefined there. You can plug in any filter you like to the CUPS framework. It must meet, or must be
made to meet, some minimal requirements. If you find (or write) a cool conversion filter of some kind, make
sure it complies with what CUPS needs and put in the right lines in mime.types and
mime.convs; then it will work seamlessly inside CUPS.
The “CUPS requirements” for filters are simple. Take filenames or stdin as
input and write to stdout. They should take these arguments:
- printer
The name of the printer queue (normally this is the name of the filter being run).
- job
The numeric job ID for the job being printed.
- user
The string from the originating-user-name attribute.
- title
The string from the job-name attribute.
- copies
The numeric value from the number-copies attribute.
- options
The job options.
- filename
(optionally) The print request file (if missing, filters expect data fed through
stdin). In most cases, it is easy to write a simple wrapper script around existing filters to make them work with CUPS.
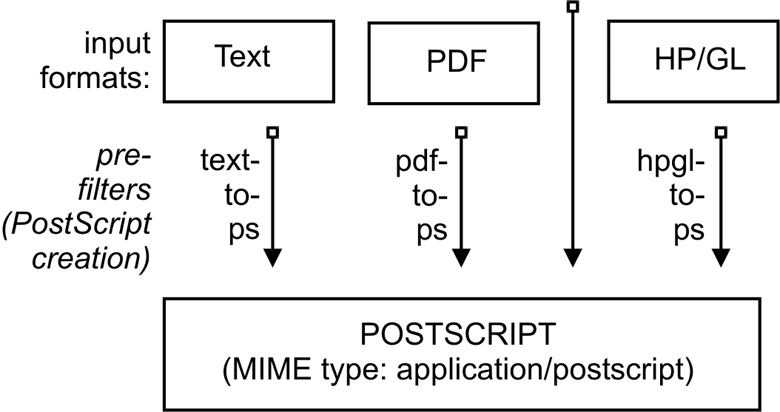
As previously stated, PostScript is the central file format to any UNIX-based printing system. From PostScript, CUPS generates raster data to feed non-PostScript printers.
But what happens if you send one of the supported non-PS formats to print? Then CUPS runs
“prefilters” on these input formats to generate PostScript first. There are prefilters to create
PostScript from ASCII text, PDF, DVI, or HP-GL. The outcome of these filters is always of MIME type
application/postscript (meaning that any device-specific print options are not yet
embedded into the PostScript by CUPS and that the next filter to be called is pstops). Another prefilter is
running on all supported image formats, the imagetops filter. Its outcome is always of
MIME type application/vnd.cups-postscript (not application/postscript), meaning it has
the print options already embedded into the file. This is shown in Prefiltering in
CUPS to Form PostScript.
pstops is a filter that is used to convert application/postscript to
application/vnd.cups-postscript. As stated earlier, this filter inserts all
device-specific print options (commands to the printer to ask for the duplexing of output, or stapling and
punching it, and so on) into the PostScript file. An example is illustrated in Adding Device-Specific Print Options.
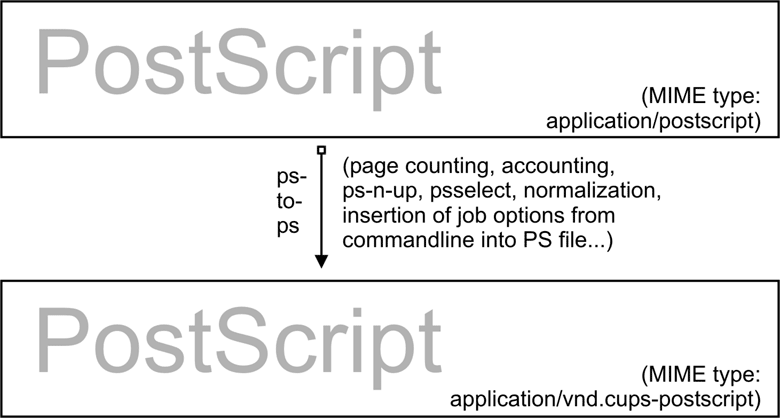
This is not all. Other tasks performed by it are:
Selecting the range of pages to be printed (e.g., you can choose to print only pages “3, 6, 8-11, 16, and 19-21”, or only odd-numbered pages).
Putting two or more logical pages on one sheet of paper (the so-called “number-up” function).
Counting the pages of the job to insert the accounting information into the
/var/log/cups/page_log.
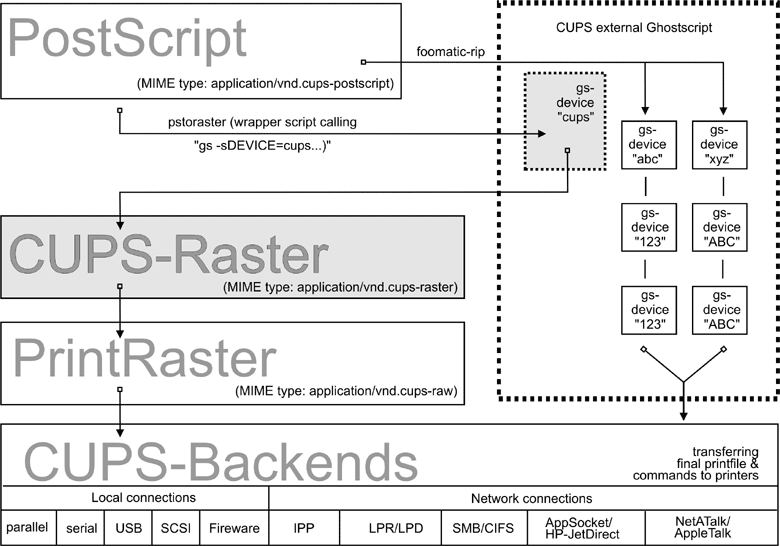
pstoraster is at the core of the CUPS filtering system. It is responsible for the first
stage of the rasterization process. Its input is of MIME type application/vnd.cups-postscript; its output is
application/vnd.cups-raster. This output format is not yet meant to be printable. Its aim is to serve as a
general-purpose input format for more specialized raster drivers that are able to
generate device-specific printer data. This is shown in the PostScript to
Intermediate Raster Format diagram.
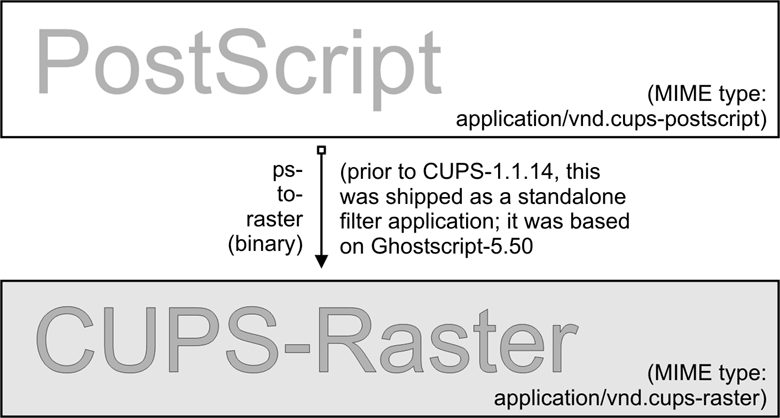
CUPS raster is a generic raster format with powerful features. It is able to include per-page information, color profiles, and more, to be used by the downstream raster drivers. Its MIME type is registered with IANA and its specification is, of course, completely open. It is designed to make it quite easy and inexpensive for manufacturers to develop Linux and UNIX raster drivers for their printer models should they choose to do so. CUPS always takes care of the first stage of rasterization so these vendors do not need to care about Ghostscript complications (in fact, there are currently more than one vendor financing the development of CUPS raster drivers). This is illustrated in the CUPS-Raster Production Using Ghostscript illustration.
CUPS versions before version 1.1.15 shipped a binary (or source code) standalone filter, named
pstoraster. pstoraster, which was derived from GNU Ghostscript
5.50 and could be installed instead of and in addition to any GNU or AFPL Ghostscript package without
conflicting.
Since version 1.1.15, this feature has changed. The functions for this filter have been integrated back
into Ghostscript (now based on GNU Ghostscript version 7.05). The pstoraster filter is
now a simple shell script calling gs with the -sDEVICE=cups parameter.
If your Ghostscript fails when this command is executed: gs -h |grep cups, you might not
be able to print, update your Ghostscript.
In the section about prefilters, we mentioned the prefilter
that generates PostScript from image formats. The imagetoraster
filter is used to convert directly from image to raster, without the
intermediate PostScript stage. It is used more often than the previously
mentioned prefilters. We summarize in a flowchart the image file
filtering in the Image Format to CUPS-Raster Format Conversion illustration.
CUPS ships with quite a variety of raster drivers for processing CUPS raster. On my system, I find in
/usr/lib/cups/filter/ the following: rastertoalps, rastertobj,
rastertoepson, rastertoescp, rastertopcl,
rastertoturboprint, rastertoapdk,
rastertodymo, rastertoescp, rastertohp,
and rastertoprinter. Don't worry if you have fewer drivers than this; some of these are
installed by commercial add-ons to CUPS (like rastertoturboprint), and others (like
rastertoprinter) by third-party driver development projects (such as Gutenprint)
wanting to cooperate as closely as possible with CUPS. See the Raster to
Printer-Specific Formats illustration.

The last part of any CUPS filtering chain is a backend. Backends are special programs that send the print-ready file to the final device. There is a separate backend program for any transfer protocol for sending print jobs over the network, and one for every local interface. Every CUPS print queue needs to have a CUPS “device-URI” associated with it. The device URI is the way to encode the backend used to send the job to its destination. Network device-URIs use two slashes in their syntax, local device URIs only one, as you can see from the following list. Keep in mind that local interface names may vary greatly from my examples, if your OS is not Linux:
- usb
This backend sends print files to USB-connected printers. An example for the CUPS device-URI to use is
usb:/dev/usb/lp0.- serial
This backend sends print files to serially connected printers. An example for the CUPS device-URI to use is
serial:/dev/ttyS0?baud=11500.- parallel
This backend sends print files to printers connected to the parallel port. An example for the CUPS device-URI to use is
parallel:/dev/lp0.- SCSI
This backend sends print files to printers attached to the SCSI interface. An example for the CUPS device-URI to use is
scsi:/dev/sr1.- lpd
This backend sends print files to LPR/LPD-connected network printers. An example for the CUPS device-URI to use is
lpd://remote_host_name/remote_queue_name.- AppSocket/HP JetDirect
This backend sends print files to AppSocket (a.k.a., HP JetDirect) connected network printers. An example for the CUPS device-URI to use is
socket://10.11.12.13:9100.- ipp
This backend sends print files to IPP-connected network printers (or to other CUPS servers). Examples for CUPS device-URIs to use are
ipp:://192.193.194.195/ipp(for many HP printers) andipp://remote_cups_server/printers/remote_printer_name.- http
This backend sends print files to HTTP-connected printers. (The http:// CUPS backend is only a symlink to the ipp:// backend.) Examples for the CUPS device-URIs to use are
http:://192.193.194.195:631/ipp(for many HP printers) andhttp://remote_cups_server:631/printers/remote_printer_name.- smb
This backend sends print files to printers shared by a Windows host. Examples of CUPS device-URIs that may be used includes:
smb://workgroup/server/printersharenamesmb://server/printersharenamesmb://username:password@workgroup/server/printersharenamesmb://username:password@server/printersharenameThe smb:// backend is a symlink to the Samba utility
smbspool(does not ship with CUPS). If the symlink is not present in your CUPS backend directory, have your root user create it:ln -s `which smbspool' /usr/lib/cups/backend/smb.
It is easy to write your own backends as shell or Perl scripts if you need any modification or extension to the CUPS print system. One reason could be that you want to create “special” printers that send the print jobs as email (through a “mailto:/” backend), convert them to PDF (through a “pdfgen:/” backend) or dump them to “/dev/null”. (In fact, I have the systemwide default printer set up to be connected to a devnull:/ backend: there are just too many people sending jobs without specifying a printer, and scripts and programs that do not name a printer. The systemwide default deletes the job and sends a polite email back to the $USER asking him or her to always specify the correct printer name.)
Not all of the mentioned backends may be present on your system or
usable (depending on your hardware configuration). One test for all
available CUPS backends is provided by the lpinfo
utility. Used with the -v parameter, it lists
all available backends:
$lpinfo -v
cupsomatic filters may be the most widely used on CUPS
installations. You must be clear that these were not
developed by the CUPS people. They are a third-party add-on to
CUPS. They utilize the traditional Ghostscript devices to render jobs
for CUPS. When troubleshooting, you should know about the
difference. Here the whole rendering process is done in one stage,
inside Ghostscript, using an appropriate device for the target
printer. cupsomatic uses PPDs that are generated from the Foomatic
Printer & Driver Database at Linuxprinting.org.
You can recognize these PPDs from the line calling the
cupsomatic filter:
*cupsFilter: "application/vnd.cups-postscript 0 cupsomatic"
You may find this line among the first 40 or so lines of the PPD
file. If you have such a PPD installed, the printer shows up in the
CUPS Web interface with a foomatic namepart for
the driver description. cupsomatic is a Perl script that runs
Ghostscript with all the complicated command line options
autoconstructed from the selected PPD and command line options given to
the print job.
However, cupsomatic is now deprecated. Its PPDs (especially the first
generation of them, still in heavy use out there) are not meeting the
Adobe specifications. You might also suffer difficulties when you try
to download them with “Point'n'Print” to Windows clients. A better
and more powerful successor is now available: it is called foomatic-rip. To use
foomatic-rip as a filter with CUPS, you need the new type of PPDs, which
have a similar but different line:
*cupsFilter: "application/vnd.cups-postscript 0 foomatic-rip"
The PPD-generating engine at Linuxprinting.org has been revamped.
The new PPDs comply with the Adobe spec. They also provide a
new way to specify different quality levels (hi-res photo, normal
color, grayscale, and draft) with a single click, whereas before you
could have required five or more different selections (media type,
resolution, inktype, and dithering algorithm). There is support for
custom-size media built in. There is support to switch
print options from page to page in the middle of a job. And the
best thing is that the new foomatic-rip works seamlessly with all
legacy spoolers too (like LPRng, BSD-LPD, PDQ, PPR, and so on), providing
for them access to use PPDs for their printing.
If you want to see an overview of all the filters and how they relate to each other, the complete picture of the puzzle is at the end of this chapter.
CUPS autoconstructs all possible filtering chain paths for any given MIME type and every printer installed. But how does it decide in favor of or against a specific alternative? (There may be cases where there is a choice of two or more possible filtering chains for the same target printer.) Simple. You may have noticed the figures in the third column of the mime.convs file. They represent virtual costs assigned to this filter. Every possible filtering chain will sum up to a total “filter cost.” CUPS decides for the most “inexpensive” route.
Tip
Setting FilterLimit 1000 in
cupsd.conf will not allow more filters to
run concurrently than will consume a total of 1000 virtual filter
cost. This is an efficient way to limit the load of any CUPS
server by setting an appropriate “FilterLimit” value. A FilterLimit of
200 allows roughly one job at a time, while a FilterLimit of 1000 allows
approximately five jobs maximum at a time.
You can tell CUPS to print (nearly) any file “raw”. “Raw” means it will not be
filtered. CUPS will send the file to the printer “as is” without bothering if the printer is able
to digest it. Users need to take care themselves that they send sensible data formats only. Raw printing can
happen on any queue if the “-o raw” option is specified on the command
line. You can also set up raw-only queues by simply not associating any PPD with it. This command:
$lpadmin -P rawprinter -v socket://11.12.13.14:9100 -E
sets up a queue named “rawprinter”, connected via the “socket” protocol (a.k.a.
“HP JetDirect”) to the device at IP address 11.12.1.3.14, using port 9100. (If you had added a
PPD with -P /path/to/PPD to this command line, you would have installed a
“normal” print queue.)
CUPS will automatically treat each job sent to a queue as a “raw” one if it can't find a PPD associated with the queue. However, CUPS will only send known MIME types (as defined in its own mime.types file) and refuse others.
Any MIME type with no rule in the /etc/cups/mime.types file is regarded as unknown
or application/octet-stream and will not be
sent. Because CUPS refuses to print unknown MIME types by default,
you will probably have experienced that print jobs originating
from Windows clients were not printed. You may have found an error
message in your CUPS logs like:
Unable to convert file 0 to printable format for job
To enable the printing of application/octet-stream files, edit
these two files:
/etc/cups/mime.convs/etc/cups/mime.types
Both contain entries (at the end of the respective files) that must be uncommented to allow raw mode
operation for application/octet-stream. In /etc/cups/mime.types
make sure this line is present:
application/octet-stream
This line (with no specific autotyping rule set) makes all files
not otherwise auto-typed a member of application/octet-stream. In
/etc/cups/mime.convs, have this
line:
application/octet-stream application/vnd.cups-raw 0 -
This line tells CUPS to use the Null Filter
(denoted as “-”, doing nothing at all) on
application/octet-stream, and tag the result as
application/vnd.cups-raw. This last one is
always a green light to the CUPS scheduler to now hand the file over
to the backend connecting to the printer and sending it over.
Note
Editing the mime.convs and the mime.types file does not
enforce “raw” printing, it only allows it.
Background.
That CUPS is a more security-aware printing system than traditional ones
does not by default allow one to send deliberate (possibly binary)
data to printing devices. (This could be easily abused to launch a
Denial of Service attack on your printer(s), causing at least the loss
of a lot of paper and ink.) “Unknown” data are regarded by CUPS
as MIME type application/octet-stream. While you
can send data “raw”, the MIME type for these must
be one that is known to CUPS and allowed by it. The file
/etc/cups/mime.types defines the “rules” of how CUPS
recognizes MIME types. The file /etc/cups/mime.convs decides which file
conversion filter(s) may be applied to which MIME types.
Originally PPDs were meant to be used for PostScript printers only. Here, they help to send device-specific commands and settings to the RIP, which processes the job file. CUPS has extended this scope for PPDs to cover non-PostScript printers too. This was not difficult, because it is a standardized file format. In a way it was logical too: CUPS handles PostScript and uses a PostScript RIP (Ghostscript) to process the job files. The only difference is that a PostScript printer has the RIP built-in, for other types of printers the Ghostscript RIP runs on the host computer.
PPDs for a non-PostScript printer have a few lines that are unique to CUPS. The most important one looks similar to this:
*cupsFilter: application/vnd.cups-raster 66 rastertoprinter
It is the last piece in the CUPS filtering puzzle. This line tells the
CUPS daemon to use as a last filter rastertoprinter. This filter
should be served as input an application/vnd.cups-raster MIME type
file. Therefore, CUPS should autoconstruct a filtering chain, which
delivers as its last output the specified MIME type. This is then
taken as input to the specified rastertoprinter filter. After
the last filter has done its work (rastertoprinter is a Gutenprint
filter), the file should go to the backend, which sends it to the
output device.
CUPS by default ships only a few generic PPDs, but they are good for several hundred printer models. You may not be able to control different paper trays, or you may get larger margins than your specific model supports. See Table 21.1“PPDs Shipped with CUPS” for summary information.
Table 22.1. PPDs Shipped with CUPS
| PPD file | Printer type |
|---|---|
| deskjet.ppd | older HP inkjet printers and compatible |
| deskjet2.ppd | newer HP inkjet printers and compatible |
| dymo.ppd | label printers |
| epson9.ppd | Epson 24-pin impact printers and compatible |
| epson24.ppd | Epson 24-pin impact printers and compatible |
| okidata9.ppd | Okidata 9-pin impact printers and compatible |
| okidat24.ppd | Okidata 24-pin impact printers and compatible |
| stcolor.ppd | older Epson Stylus Color printers |
| stcolor2.ppd | newer Epson Stylus Color printers |
| stphoto.ppd | older Epson Stylus Photo printers |
| stphoto2.ppd | newer Epson Stylus Photo printers |
| laserjet.ppd | all PCL printers |
Native CUPS rasterization works in two steps:
First is the
pstorasterstep. It uses the special CUPS device from ESP Ghostscript 7.05.x as its tool.Second is the
rasterdriverstep. It uses various device-specific filters; there are several vendors who provide good quality filters for this step. Some are free software, some are shareware, and some are proprietary.
Often this produces better quality (and has several more advantages) than other methods. This is shown in the cupsomatic/foomatic Processing Versus Native CUPS illustration.
One other method is the cupsomatic/foomatic-rip
way. Note that cupsomatic is not made by the CUPS
developers. It is an independent contribution to printing development,
made by people from Linuxprinting.org.[6]
cupsomatic is no longer developed, maintained, or supported. It now been
replaced by foomatic-rip. foomatic-rip is a complete rewrite
of the old cupsomatic idea, but very much improved and generalized to
other (non-CUPS) spoolers. An upgrade to foomatic-rip is strongly
advised, especially if you are upgrading to a recent version of CUPS,
too.
Like the old cupsomatic method, the foomatic-rip (new) method
from Linuxprinting.org uses the traditional Ghostscript print file processing, doing everything in a single
step. It therefore relies on all the other devices built into Ghostscript. The quality is as good (or bad) as
Ghostscript rendering is in other spoolers. The advantage is that this method supports many printer models not
supported (yet) by the more modern CUPS method.
Of course, you can use both methods side by side on one system (and even for one printer, if you set up different queues) and find out which works best for you.
cupsomatic kidnaps the print file after the
application/vnd.cups-postscript stage and deviates it through the CUPS-external,
systemwide Ghostscript installation. Therefore, the print file bypasses the pstoraster
filter (and also bypasses the CUPS raster drivers rastertosomething). After Ghostscript
finished its rasterization, cupsomatic hands the rendered file directly to the CUPS
backend. cupsomatic/foomatic Processing Versus Native
CUPS, illustrates the difference between native CUPS rendering and the
Foomatic/cupsomatic method.
Here are a few examples of commonly occurring filtering chains to illustrate the workings of CUPS.
Assume you want to print a PDF file to an HP JetDirect-connected PostScript printer, but you want to print pages 3-5, 7, and 11-13 only, and you want to print them “two-up” and “duplex”:
Your print options (page selection as required, two-up, duplex) are passed to CUPS on the command line.
The (complete) PDF file is sent to CUPS and autotyped as
application/pdf.The file therefore must first pass the
pdftopsprefilter, which produces PostScript MIME typeapplication/postscript(a preview here would still show all pages of the original PDF).The file then passes the
pstopsfilter that applies the command line options: it selects pages 2-5, 7, and 11-13, creates the imposed layout “two pages on one sheet”, and inserts the correct “duplex” command (as defined in the printer's PPD) into the new PostScript file; the file is now of PostScript MIME typeapplication/vnd.cups-postscript.The file goes to the
socketbackend, which transfers the job to the printers.
The resulting filter chain, therefore, is as shown in the PDF to socket chain illustration.

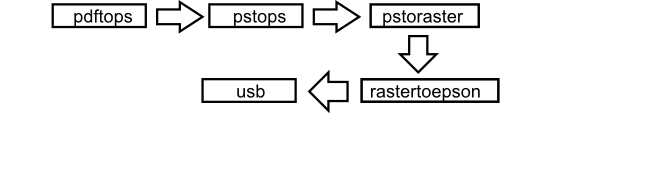
Assume you want to print the same filter to an USB-connected Epson Stylus Photo Printer installed with the CUPS
stphoto2.ppd. The first few filtering stages are nearly the same:
Your print options (page selection as required, two-up, duplex) are passed to CUPS on the command line.
The (complete) PDF file is sent to CUPS and autotyped as
application/pdf.The file must first pass the
pdftopsprefilter, which produces PostScript MIME typeapplication/postscript(a preview here would still show all pages of the original PDF).The file then passes the “pstops” filter that applies the command line options: it selects the pages 2-5, 7, and 11-13, creates the imposed layout “two pages on one sheet,” and inserts the correct “duplex” command (oops this printer and PPD do not support duplex printing at all, so this option will be ignored) into the new PostScript file; the file is now of PostScript MIME type
application/vnd.cups-postscript.The file then passes the
pstorasterstage and becomes MIME typeapplication/cups-raster.Finally, the
rastertoepsonfilter does its work (as indicated in the printer's PPD), creating the printer-specific raster data and embedding any user-selected print options into the print data stream.The file goes to the
usbbackend, which transfers the job to the printers.
The resulting filter chain therefore is as shown in the PDF to USB Chain illustration.
On the Internet you can now find many thousands of CUPS-PPD files (with their companion filters), in many national languages supporting more than 1,000 non-PostScript models.
ESP PrintPro (commercial, non-free) is packaged with more than 3,000 PPDs, ready for successful use “out of the box” on Linux, Mac OS X, IBM-AIX, HP-UX, Sun-Solaris, SGI-IRIX, Compaq Tru64, Digital UNIX, and other commercial Unices (it is written by the CUPS developers themselves and its sales help finance the further development of CUPS, as they feed their creators).
The Gutenprint Project (GPL, free software) provides around 140 PPDs (supporting nearly 400 printers, many driven to photo quality output), to be used alongside the Gutenprint CUPS filters.
TurboPrint (shareware, non-free) supports roughly the same number of printers in excellent quality.
OMNI (LPGL, free) is a package made by IBM, now containing support for more than 400 printers, stemming from the inheritance of IBM OS/2 know-how ported over to Linux (CUPS support is in a beta stage at present).
HPIJS (BSD-style licenses, free) supports approximately 150 of HP's own printers and also provides excellent print quality now (currently available only via the Foomatic path).
Foomatic/cupsomatic (LPGL, free) from Linuxprinting.org provide PPDs for practically every Ghostscript filter known to the world (including Omni, Gutenprint, and HPIJS).
CUPS also supports the use of “interface scripts” as known from
System V AT&T printing systems. These are often used for PCL
printers, from applications that generate PCL print jobs. Interface
scripts are specific to printer models. They have a role similar to
PPDs for PostScript printers. Interface scripts may inject the Escape
sequences as required into the print data stream if the user, for example, selects
a certain paper tray, or changes paper orientation, or uses A3
paper. Interface scripts are practically unknown in the Linux
realm. On HP-UX platforms they are more often used. You can use any
working interface script on CUPS too. Just install the printer with
the -i option:
root#lpadmin -p pclprinter -v socket://11.12.13.14:9100 \ -i /path/to/interface-script
Interface scripts might be the “unknown animal” to many. However, with CUPS they provide the easiest way to plug in your own custom-written filtering script or program into one specific print queue (some information about the traditional use of interface scripts is found at http://playground.sun.com/printing/documentation/interface.html).
Network printing covers a lot of ground. To understand what exactly goes on with Samba when it is printing on behalf of its Windows clients, let's first look at a “purely Windows” setup: Windows clients with a Windows NT print server.
Windows clients printing to an NT-based print server have two options. They may:
Execute the driver locally and render the GDI output (EMF) into the printer-specific format on their own.
Send the GDI output (EMF) to the server, where the driver is executed to render the printer-specific output.
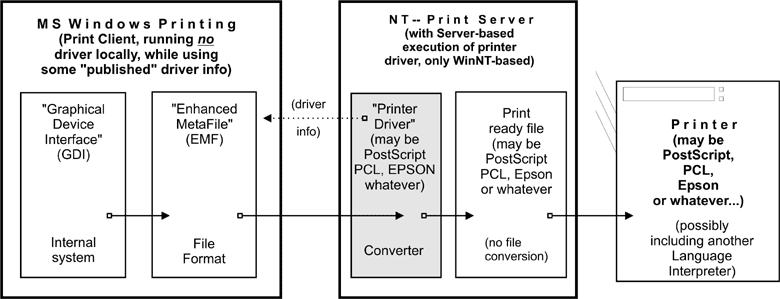
Both print paths are shown in the flowcharts in Print Driver Execution on the Client, and Print Driver Execution on the Server.
In the first case, the print server must spool the file as raw, meaning it shouldn't touch the job file and try to convert it in any way. This is what a traditional UNIX-based print server can do too, and at a better performance and more reliably than an NT print server. This is what most Samba administrators probably are familiar with. One advantage of this setup is that this “spooling-only” print server may be used even if no driver(s) for UNIX is available. It is sufficient to have the Windows client drivers available and installed on the clients. This is illustrated in the Print Driver Execution on the Client diagram.
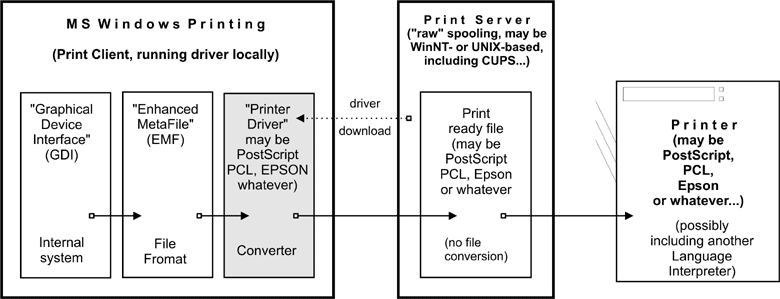
The other path executes the printer driver on the server. The client transfers print files in EMF format to the server. The server uses the PostScript, PCL, ESC/P, or other driver to convert the EMF file into the printer-specific language. It is not possible for UNIX to do the same. Currently, there is no program or method to convert a Windows client's GDI output on a UNIX server into something a printer could understand. This is illustrated in the Print Driver Execution on the Server diagram.
However, something similar is possible with CUPS, so read on.
Since UNIX print servers cannot execute the Win32 program code on their platform, the picture is somewhat different. However, this does not limit your options all that much. On the contrary, you may have a way here to implement printing features that are not possible otherwise.
Here is a simple recipe showing how you can take advantage of CUPS's powerful features for the benefit of your Windows network printing clients:
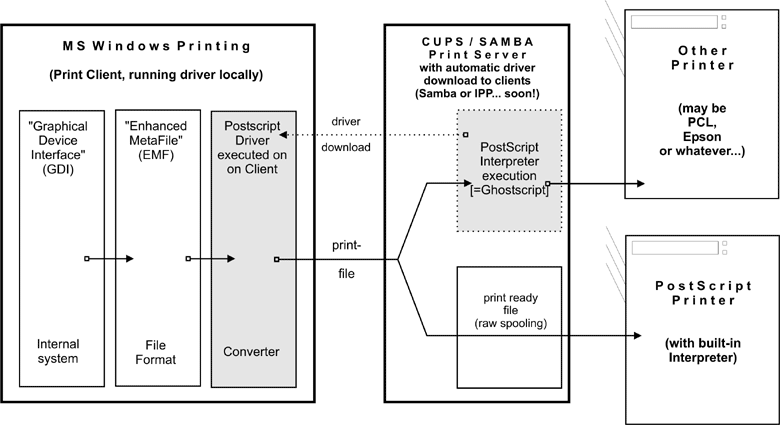
Let the Windows clients send PostScript to the CUPS server.
Let the CUPS server render the PostScript into device-specific raster format.
This requires the clients to use a PostScript driver (even if the printer is a non-PostScript model. It also requires that you have a driver on the CUPS server.
First, to enable CUPS-based printing through Samba, the following options should be set in your smb.conf
file [global] section:
printing = cups |
printcap = cups |
When these parameters are specified, all manually set print directives (like print command or lppause command) in smb.conf (as well as in Samba itself) will be
ignored. Instead, Samba will directly interface with CUPS through its application program interface (API), as
long as Samba has been compiled with CUPS library (libcups) support. If Samba has not been compiled with CUPS
support, and if no other print commands are set up, then printing will use the System V
AT&T command set, with the -oraw option automatically passing through (if you want your own defined print
commands to work with a Samba server that has CUPS support compiled in, simply use classicalprinting = sysv). This is illustrated in the Printing via
CUPS/Samba Server diagram.
Samba must use its own spool directory (it is set by a line similar to path = /var/spool/samba, in the [printers] or [printername] section of smb.conf). Samba receives the job in its own spool space and passes it
into the spool directory of CUPS (the CUPS spool directory is set by the RequestRoot
directive in a line that defaults to RequestRoot /var/spool/cups). CUPS checks the
access rights of its spool directory and resets it to healthy values with every restart. We have seen quite a
few people who used a common spooling space for Samba and CUPS, and struggled for weeks with this
“problem.”
A Windows user authenticates only to Samba (by whatever means is configured). If Samba runs on the same host as CUPS, you only need to allow “localhost” to print. If it runs on different machines, you need to make sure the Samba host gets access to printing on CUPS.
This section discusses the use of CUPS filters on the server configuration where clients make use of a PostScript driver with CUPS-PPDs.
PPDs can control all print device options. They are usually provided by the manufacturer if you own a PostScript printer, that is. PPD files are always a component of PostScript printer drivers on MS Windows or Apple Mac OS systems. They are ASCII files containing user-selectable print options, mapped to appropriate PostScript, PCL, or PJL commands for the target printer. Printer driver GUI dialogs translate these options “on the fly” into buttons and drop-down lists for the user to select.
CUPS can load, without any conversions, the PPD file from any Windows (NT is recommended) PostScript driver
and handle the options. There is a Web browser interface to the print options (select http://localhost:631/printers/ and click on one
button to see it) or a command line interface (see man
lpoptions or see if you have lphelp on your system). There are also some
different GUI front-ends on Linux/UNIX, which can present PPD options to users. PPD options are normally meant
to be evaluated by the PostScript RIP on the real PostScript printer.
CUPS does not limit itself to “real” PostScript printers in its use of PPDs. The CUPS developers have extended the scope of the PPD concept to also describe available device and driver options for non-PostScript printers through CUPS-PPDs.
This is logical, because CUPS includes a fully featured PostScript interpreter (RIP). This RIP is based on
Ghostscript. It can process all received PostScript (and additionally many other file formats) from clients.
All CUPS-PPDs geared to non-PostScript printers contain an additional line, starting with the keyword
*cupsFilter. This line tells the CUPS print system which printer-specific filter to use
for the interpretation of the supplied PostScript. Thus CUPS lets all its printers appear as PostScript
devices to its clients, because it can act as a PostScript RIP for those printers, processing the received
PostScript code into a proper raster print format.
CUPS-PPDs can also be used on Windows clients, on top of a “core” PostScript driver (now recommended is the CUPS PostScript Driver for Windows NT/200x/XP; you can also use the Adobe one, with limitations). This feature enables CUPS to do a few tricks no other spooler can do:
Act as a networked PostScript RIP handling print files from all client platforms in a uniform way.
Act as a central accounting and billing server, since all files are passed through the pstops filter and are therefore logged in the CUPS
page_logfile. Note: this cannot happen with “raw” print jobs, which always remain unfiltered per definition.Enable clients to consolidate on a single PostScript driver, even for many different target printers.
Using CUPS PPDs on Windows clients enables them to control all print job settings just as a UNIX client can do.
This setup may be of special interest to people experiencing major problems in WTS environments. WTS often need a multitude of non-PostScript drivers installed to run their clients' variety of different printer models. This often imposes the price of much increased instability.
Windows NT printer drivers, which run in “kernel mode”, introduce a high risk for the stability of the system if the driver is not really stable and well-tested. And there are a lot of bad drivers out there! Especially notorious is the example of the PCL printer driver that had an additional sound module running to notify users via soundcard of their finished jobs. Do I need to say that this one was also reliably causing “blue screens of death” on a regular basis?
PostScript drivers are generally well-tested. They are not known to cause any problems, even though they also run in kernel mode. This might be because until now there have been only two different PostScript drivers: the one from Adobe and the one from Microsoft. Both are well-tested and are as stable as you can imagine on Windows. The CUPS driver is derived from the Microsoft one.
In an attempt to work around problems, site administrators have resorted to restricting the allowed drivers installed on their WTS to one generic PCL and one PostScript driver. This, however, restricts the number of printer options available for clients to use. Often they can't get out more than simplex prints from one standard paper tray, while their devices could do much better if driven by a different driver!
Using a PostScript driver, enabled with a CUPS-PPD, seems to be a very elegant way to overcome all these shortcomings. There are, depending on the version of Windows OS you use, up to three different PostScript drivers now available: Adobe, Microsoft, and CUPS PostScript drivers. None of them is known to cause major stability problems on WTS (even if used with many different PPDs). The clients will be able to (again) choose paper trays, duplex printing, and other settings. However, there is a certain price for this too: a CUPS server acting as a PostScript RIP for its clients requires more CPU and RAM than when just acting as a “raw spooling” device. Plus, this setup is not yet widely tested, although the first feedbacks look very promising.
More recent printer drivers on W200x and XP no longer run in kernel mode (unlike Windows NT). However, both operating systems can still use the NT drivers, running in kernel mode (you can roughly tell which is which as the drivers in subdirectory “2” of “W32X86” are “old” ones). As was said before, the Adobe as well as the Microsoft PostScript drivers are not known to cause any stability problems. The CUPS driver is derived from the Microsoft one. There is a simple reason for this: the MS DDK (Device Development Kit) for Windows NT (which used to be available at no cost to licensees of Visual Studio) includes the source code of the Microsoft driver, and licensees of Visual Studio are allowed to use and modify it for their own driver development efforts. This is what the CUPS people have done. The license does not allow them to publish the whole of the source code. However, they have released the “diff” under the GPL, and if you are the owner of an “MS DDK for Windows NT,” you can check the driver yourself.
As we have said before, all previously known methods to prepare client printer drivers on the Samba server for download and Point'n'Print convenience of Windows workstations are working with CUPS, too. These methods were described in Classical Printing. In reality, this is a pure Samba business and relates only to the Samba-Windows client relationship.
The cupsaddsmb utility (shipped with all current CUPS versions) is an alternative
method to transfer printer drivers into the Samba [print$] share. Remember, this
share is where clients expect drivers deposited and set up for download and installation. It makes the sharing
of any (or all) installed CUPS printers quite easy. cupsaddsmb can use the Adobe PostScript
driver as well as the newly developed CUPS PostScript driver for Windows NT/200x/XP.
cupsaddsmb does not work with arbitrary vendor printer drivers,
but only with the exact driver files that are named in its man page.
The CUPS printer driver is available from the CUPS download site. Its package name is
cups-samba-[version].tar.gz. It is preferred over the Adobe drivers because it has a
number of advantages:
It supports a much more accurate page accounting.
It supports banner pages and page labels on all printers.
It supports the setting of a number of job IPP attributes (such as job priority, page label, and job billing).
However, currently only Windows NT, 2000, and XP are supported by the CUPS drivers. You will also need to get the respective part of the Adobe driver if you need to support Windows 95, 98, and Me clients.
Prior to running cupsaddsmb, you need the settings in
smb.conf as shown in the smb.conf for cupsaddsmb Usage.
Example 22.3. smb.conf for cupsaddsmb Usage
CUPS users may get the exact same package from http://www.cups.org/software.html. It is a separate package
from the CUPS-based software files, tagged as CUPS 1.1.x Windows NT/200x/XP Printer Driver for Samba (tar.gz,
192k). The filename to download is cups-samba-1.1.x.tar.gz. Upon untar and unzipping, it
will reveal these files:
root#tar xvzf cups-samba-1.1.19.tar.gzcups-samba.install cups-samba.license cups-samba.readme cups-samba.remove cups-samba.ss
These have been packaged with the ESP meta-packager software EPM. The *.install and
*.remove files are simple shell scripts, which untar the *.ss (the
*.ss is nothing else but a tar archive, which can be untarred by “tar” too).
Then it puts the content into /usr/share/cups/drivers/. This content includes three
files:
root#tar tv cups-samba.sscupsdrvr.dll cupsui.dll cups.hlp
The cups-samba.install shell scripts are easy to
handle:
root#./cups-samba.install[....] Installing software... Updating file permissions... Running post-install commands... Installation is complete.
The script should automatically put the driver files into the
/usr/share/cups/drivers/ directory:
root#cp /usr/share/drivers/cups.hlp /usr/share/cups/drivers/
Warning
Due to a bug, one recent CUPS release puts the cups.hlp driver file
into/usr/share/drivers/ instead of /usr/share/cups/drivers/. To work
around this, copy/move the file (after running the ./cups-samba.install script) manually to
the correct place.
This new CUPS PostScript driver is currently binary only, but free of charge. No complete source code is provided (yet). The reason is that it has been developed with the help of the Microsoft DDK and compiled with Microsoft Visual Studio 6. Driver developers are not allowed to distribute the whole of the source code as free software. However, CUPS developers released the “diff” in source code under the GPL, so anybody with a license for Visual Studio and a DDK will be able to compile for himself or herself.
The CUPS drivers do not support the older Windows 95/98/Me, but only the Windows NT/2000/XP client.
Windows NT, 2000, and XP are supported by:
cups.hlp
cupsdrvr.dll
cupsui.dll
Adobe drivers are available for the older Windows 95/98/Me as well as for Windows NT/2000/XP clients. The set of files is different from the different platforms.
Windows 95, 98, and ME are supported by:
ADFONTS.MFM
ADOBEPS4.DRV
ADOBEPS4.HLP
DEFPRTR2.PPD
ICONLIB.DLL
PSMON.DLL
Windows NT, 2000, and XP are supported by:
ADOBEPS5.DLL
ADOBEPSU.DLL
ADOBEPSU.HLP
Note
If both the Adobe driver files and the CUPS driver files for the support of Windows NT/200x/XP are presently installed on the server, the Adobe files will be ignored and the CUPS files will be used. If you prefer for whatever reason to use Adobe-only drivers, move away the three CUPS driver files. The Windows 9x/Me clients use the Adobe drivers in any case.
Acquiring the Adobe driver files seems to be unexpectedly difficult for many users. They are not available on
the Adobe Web site as single files, and the self-extracting and/or self-installing Windows-.exe is not easy to
locate either. You probably need to use the included native installer and run the installation process on one
client once. This will install the drivers (and one generic PostScript printer) locally on the client. When
they are installed, share the generic PostScript printer. After this, the client's [print$] share holds the Adobe files, which you can get with smbclient from the CUPS host.
Users of the ESP Print Pro software are able to install the ESP print drivers package as an alternative to the
Adobe PostScript drivers. To do so, retrieve the driver files from the normal download area of the ESP Print
Pro software at Easy Software web site.
You need to locate the link labeled “SAMBA” among the Download Printer Drivers for ESP
Print Pro 4.x area and download the package. Once installed, you can prepare any driver by simply
highlighting the printer in the Printer Manager GUI and selecting Export Driver... from
the menu. Of course, you need to have prepared Samba beforehand to handle the driver files; that is, set up
the [print$] share, and so on. The ESP Print Pro package includes the CUPS driver
files as well as a (licensed) set of Adobe drivers for the Windows 95/98/Me client family.
Once you have run the install script (and possibly manually moved the cups.hlp file to
/usr/share/cups/drivers/), the driver is ready to be put into Samba's [print$] share (which often maps to /etc/samba/drivers/ and contains a
subdirectory tree with WIN40 and W32X86 branches). You do this by
running cupsaddsmb (see also man cupsaddsmb for CUPS since release
1.1.16).
Tip
You may need to put root into the smbpasswd file by running smbpasswd; this is especially
important if you should run this whole procedure for the first time and are not working in an environment
where everything is configured for single sign-on to a Windows Domain Controller.
Once the driver files are in the [print$] share and are initialized, they are ready
to be downloaded and installed by the Windows NT/200x/XP clients.
Note
Win 9x/Me clients will not work with the CUPS PostScript driver. For these you still need to use the
ADOBE*.* drivers, as previously stated.
Note
It is not harmful if you still have the ADOBE*.* driver files from previous installations
in the /usr/share/cups/drivers/ directory. The new cupsaddsmb (from
1.1.16) will automatically prefer its own drivers if it finds both.
Note
Should your Windows clients have had the old ADOBE*.* files for the Adobe PostScript
driver installed, the download and installation of the new CUPS PostScript driver for Windows NT/200x/XP will
fail at first. You need to wipe the old driver from the clients first. It is not enough to
“delete” the printer, because the driver files will still be kept by the clients and re-used if
you try to re-install the printer. To really get rid of the Adobe driver files on the clients, open the
Printers folder (possibly via Start -> Settings -> Control Panel ->
Printers), right-click on the folder background, and select . When the new dialog opens, select the Drivers tab. On the list
select the driver you want to delete and click the Delete button. This will only work if
there is not one single printer left that uses that particular driver. You need to “delete” all
printers using this driver in the Printers folder first. You will need Administrator
privileges to do this.
Note
Once you have successfully downloaded the CUPS PostScript driver to a client, you can easily switch all
printers to this one by proceeding as described in Classical Printing
Support. Either change a driver for an existing printer by running the Printer
Properties dialog, or use rpcclient with the setdriver
subcommand.
Are you interested in a comparison between the CUPS and the Adobe PostScript drivers? For our purposes, these are the most important items that weigh in favor of CUPS:
No hassle with the Adobe EULA.
No hassle with the question, “Where do I get the ADOBE*.* driver files?”
The Adobe drivers (on request of the printer PPD associated with them) often put a PJL header in front of the main PostScript part of the print file. Thus, the print file starts with
<1B >%-12345Xor<escape>%-12345Xinstead of%!PS. This leads to the CUPS daemon autotyping the incoming file as a print-ready file, not initiating a pass through thepstopsfilter (to speak more technically, it is not regarded as the generic MIME-typeapplication/postscript, but as the more special MIME typeapplication/cups.vnd-postscript), which therefore also leads to the page accounting in/var/log/cups/page_lognot receiving the exact number of pages; instead the dummy page number of “1” is logged in a standard setup).The Adobe driver has more options to misconfigure the PostScript generated by it (like setting it inadvertently to Optimize for Speed instead of Optimize for Portability, which could lead to CUPS being unable to process it).
The CUPS PostScript driver output sent by Windows clients to the CUPS server is guaranteed to autotype as the generic MIME type
application/postscript, thus passing through the CUPSpstopsfilter and logging the correct number of pages in thepage_logfor accounting and quota purposes.The CUPS PostScript driver supports the sending of additional standard (IPP) print options by Windows NT/200x/XP clients. Such additional print options are naming the CUPS standard banner pages (or the custom ones, should they be installed at the time of driver download), using the CUPS page-label option, setting a job priority, and setting the scheduled time of printing (with the option to support additional useful IPP job attributes in the future).
The CUPS PostScript driver supports the inclusion of the new
*cupsJobTicketcomments at the beginning of the PostScript file (which could be used in the future for all sorts of beneficial extensions on the CUPS side, but which will not disturb any other applications because they will regard it as a comment and simply ignore it).The CUPS PostScript driver will be the heart of the fully fledged CUPS IPP client for Windows NT/200x/XP to be released soon (probably alongside the first beta release for CUPS 1.2).
The cupsaddsmb command copies the needed files into your [print$]
share. Additionally, the PPD associated with this printer is copied from /etc/cups/ppd/
to [print$]. There the files wait for convenient Windows client installations via
Point'n'Print. Before we can run the command successfully, we need to be sure that we can authenticate toward
Samba. If you have a small network, you are probably using user-level security (security = user).
Here is an example of a successfully run cupsaddsmb command:
root#cupsaddsmb -U root infotec_IS2027Password for root required to access localhost via Samba:['secret']
To share all printers and drivers, use the
-a parameter instead of a printer name. Since
cupsaddsmb “exports” the printer drivers to Samba, it should be
obvious that it only works for queues with a CUPS driver associated.
Probably you want to see what's going on. Use the
-v parameter to get a more verbose output. The
output below was edited for better readability: all “\” at the end of
a line indicate that I inserted an artificial line break plus some
indentation here:
root#cupsaddsmb -U root -v infotec_2105Password for root required to access localhost via GANDALF: Running command: smbclient //localhost/print\$ -N -U'root%secret' \ -c 'mkdir W32X86; \ put /var/spool/cups/tmp/3e98bf2d333b5 W32X86/infotec_2105.ppd; \ put /usr/share/cups/drivers/cupsdrvr.dll W32X86/cupsdrvr.dll; \ put /usr/share/cups/drivers/cupsui.dll W32X86/cupsui.dll; \ put /usr/share/cups/drivers/cups.hlp W32X86/cups.hlp' added interface ip=10.160.51.60 bcast=10.160.51.255 nmask=255.255.252.0 Domain=[CUPS-PRINT] OS=[UNIX] Server=[Samba 2.2.7a] NT_STATUS_OBJECT_NAME_COLLISION making remote directory \W32X86 putting file /var/spool/cups/tmp/3e98bf2d333b5 as \W32X86/infotec_2105.ppd putting file /usr/share/cups/drivers/cupsdrvr.dll as \W32X86/cupsdrvr.dll putting file /usr/share/cups/drivers/cupsui.dll as \W32X86/cupsui.dll putting file /usr/share/cups/drivers/cups.hlp as \W32X86/cups.hlp Running command: rpcclient localhost -N -U'root%secret' -c 'adddriver "Windows NT x86" \ "infotec_2105:cupsdrvr.dll:infotec_2105.ppd:cupsui.dll:cups.hlp:NULL: \ RAW:NULL"' cmd = adddriver "Windows NT x86" \ "infotec_2105:cupsdrvr.dll:infotec_2105.ppd:cupsui.dll:cups.hlp:NULL: \ RAW:NULL" Printer Driver infotec_2105 successfully installed. Running command: smbclient //localhost/print\$ -N -U'root%secret' \ -c 'mkdir WIN40; \ put /var/spool/cups/tmp/3e98bf2d333b5 WIN40/infotec_2105.PPD; \ put /usr/share/cups/drivers/ADFONTS.MFM WIN40/ADFONTS.MFM; \ put /usr/share/cups/drivers/ADOBEPS4.DRV WIN40/ADOBEPS4.DRV; \ put /usr/share/cups/drivers/ADOBEPS4.HLP WIN40/ADOBEPS4.HLP; \ put /usr/share/cups/drivers/DEFPRTR2.PPD WIN40/DEFPRTR2.PPD; \ put /usr/share/cups/drivers/ICONLIB.DLL WIN40/ICONLIB.DLL; \ put /usr/share/cups/drivers/PSMON.DLL WIN40/PSMON.DLL;' added interface ip=10.160.51.60 bcast=10.160.51.255 nmask=255.255.252.0 Domain=[CUPS-PRINT] OS=[UNIX] Server=[Samba 2.2.7a] NT_STATUS_OBJECT_NAME_COLLISION making remote directory \WIN40 putting file /var/spool/cups/tmp/3e98bf2d333b5 as \WIN40/infotec_2105.PPD putting file /usr/share/cups/drivers/ADFONTS.MFM as \WIN40/ADFONTS.MFM putting file /usr/share/cups/drivers/ADOBEPS4.DRV as \WIN40/ADOBEPS4.DRV putting file /usr/share/cups/drivers/ADOBEPS4.HLP as \WIN40/ADOBEPS4.HLP putting file /usr/share/cups/drivers/DEFPRTR2.PPD as \WIN40/DEFPRTR2.PPD putting file /usr/share/cups/drivers/ICONLIB.DLL as \WIN40/ICONLIB.DLL putting file /usr/share/cups/drivers/PSMON.DLL as \WIN40/PSMON.DLL Running command: rpcclient localhost -N -U'root%secret' \ -c 'adddriver "Windows 4.0" \ "infotec_2105:ADOBEPS4.DRV:infotec_2105.PPD:NULL:ADOBEPS4.HLP: \ PSMON.DLL:RAW:ADOBEPS4.DRV,infotec_2105.PPD,ADOBEPS4.HLP,PSMON.DLL, \ ADFONTS.MFM,DEFPRTR2.PPD,ICONLIB.DLL"' cmd = adddriver "Windows 4.0" "infotec_2105:ADOBEPS4.DRV:\ infotec_2105.PPD:NULL:ADOBEPS4.HLP:PSMON.DLL:RAW:ADOBEPS4.DRV,\ infotec_2105.PPD,ADOBEPS4.HLP,PSMON.DLL,ADFONTS.MFM,DEFPRTR2.PPD,\ ICONLIB.DLL" Printer Driver infotec_2105 successfully installed. Running command: rpcclient localhost -N -U'root%secret' \ -c 'setdriver infotec_2105 infotec_2105' cmd = setdriver infotec_2105 infotec_2105 Successfully set infotec_2105 to driver infotec_2105.
Warning
You will see the root password for the Samba account printed on screen.
If you look closely, you'll discover your root password was transferred unencrypted over the wire, so beware!
Also, if you look further, you may discover error messages like NT_STATUS_OBJECT_NAME_COLLISION in the output.
This will occur when the directories WIN40 and W32X86 already existed in the [print$]
driver download share (from a previous driver installation). These are harmless warning messages.
What has happened? What did cupsaddsmb do? There are five stages of the procedure:
Call the CUPS server via IPP and request the driver files and the PPD file for the named printer.
Store the files temporarily in the local TEMPDIR (as defined in
cupsd.conf).Connect via smbclient to the Samba server's
[print$]share and put the files into the share's WIN40 (for Windows 9x/Me) and W32X86 (for Windows NT/200x/XP) subdirectories.Connect via rpcclient to the Samba server and execute the
adddrivercommand with the correct parameters.Connect via rpcclient to the Samba server a second time and execute the
setdrivercommand.
Note
You can run the cupsaddsmb utility with parameters to specify one remote host as Samba host
and a second remote host as CUPS host. Especially if you want to get a deeper understanding, it is a good idea
to try it and see more clearly what is going on (though in real life most people will have their CUPS and
Samba servers run on the same host):
root#cupsaddsmb -H sambaserver -h cupsserver -v printer
You must always check if the utility completed successfully in all fields. You need at minimum these three messages among the output:
Printer Driver infotec_2105 successfully installed. # (for the W32X86 == Windows NT/200x/XP architecture).
Printer Driver infotec_2105 successfully installed. # (for the WIN40 == Windows 9x/Me architecture).
Successfully set [printerXPZ] to driver [printerXYZ].
These messages are probably not easily recognized in the general
output. If you run cupsaddsmb with the -a
parameter (which tries to prepare all active CUPS
printer drivers for download), you might miss if individual printer
drivers had problems installing properly. A redirection of the
output will help you analyze the results in retrospective.
If you get:
SetPrinter call failed!
result was WERR_ACCESS_DENIED
it means that you might have set use client driver = yes for this printer.
Setting it to “no” will solve the problem. Refer to the smb.conf man page for explanation of
the use client driver.
Note
It is impossible to see any diagnostic output if you do not run cupsaddsmb in verbose mode.
Therefore, we strongly recommend against use of the default quiet mode. It will hide any problems from you that
might occur.
Can't get the standard cupsaddsmb command to run on a Samba PDC? Are you asked for the
password credential again and again, and the command just will not take off at all? Try one of these
variations:
root#cupsaddsmb -U MIDEARTH\\root -v printernameroot#cupsaddsmb -H SAURON -U MIDEARTH\\root -v printernameroot#cupsaddsmb -H SAURON -U MIDEARTH\\root -h cups-server -v printername
(Note the two backslashes: the first one is required to “escape” the second one).
The cupsaddsmb Flowchart shows a chart about the procedures, command flows, and
data flows of the cupaddsmb command. Note again: cupsaddsmb is
not intended to, and does not work with, raw print queues!
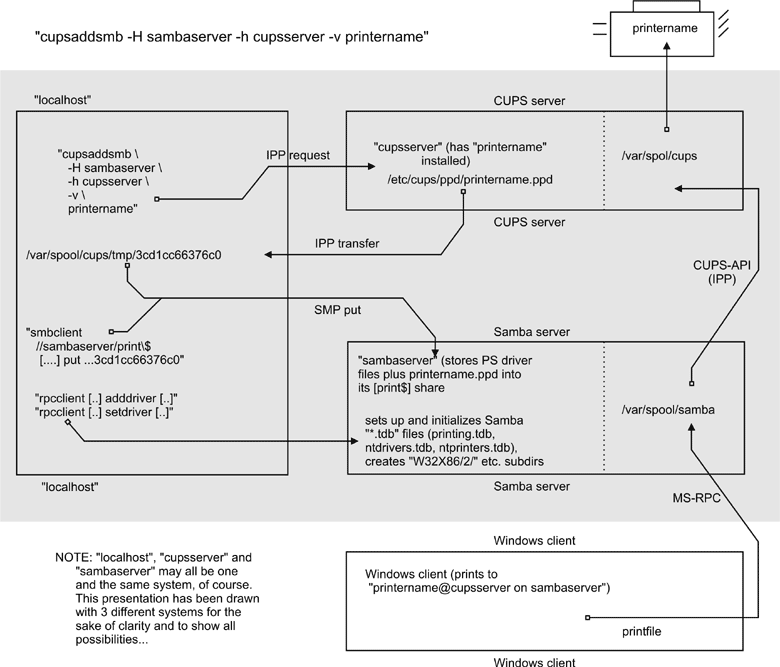
After cupsaddsmb is completed, your driver is prepared for the clients to use. Here are the
steps you must perform to download and install it via Point'n'Print. From a Windows client, browse to the
CUPS/Samba server:
After a few seconds, there should be a new printer in your client's local
Printers folder. On Windows XP it will follow a naming convention of
PrinterName on SambaServer. (In my current case it is infotec_2105 on kde-bitshop). If
you want to test it and send your first job from an application like Microsoft Word,
the new printer appears in a
\\SambaServer\PrinterName entry in the drop-down list of available printers.
cupsaddsmb will only reliably work with CUPS version 1.1.15 or higher and with Samba
version 2.2.4, or later. If it does not work, or if the automatic printer driver download to the clients does
not succeed, you can still manually install the CUPS printer PPD on top of the Adobe PostScript driver on
clients. Then point the client's printer queue to the Samba printer share for a UNC type of connection:
C:\>net use lpt1: \\sambaserver\printershare /user:ntadmin
should you desire to use the CUPS networked PostScript RIP functions. (Note that user “ntadmin” needs to be a valid Samba user with the required privileges to access the printershare.) This sets up the printer connection in the traditional LanMan way (not using MS-RPC).
Printing works, but there are still problems. Most jobs print well, some do not print at all. Some jobs have problems with fonts, which do not look very good. Some jobs print fast and some are dead-slow. Many of these problems can be greatly reduced or even completely eliminated if you follow a few guidelines. Remember, if your print device is not PostScript-enabled, you are treating your Ghostscript installation on your CUPS host with the output your client driver settings produce. Treat it well:
Avoid the PostScript Output Option: Optimize for Speed setting. Use the Optimize for Portability instead (Adobe PostScript driver).
Don't use the Page Independence: NO setting. Instead, use Page Independence: YES (CUPS PostScript Driver).
Recommended is the True Type Font Downloading Option: Native True Type over Automatic and Outline; you should by all means avoid Bitmap (Adobe PostScript Driver).
Choose True Type Font: Download as Softfont into Printer over the default Replace by Device Font (for exotic fonts, you may need to change it back to get a printout at all; Adobe).
Sometimes you can choose PostScript Language Level: in case of problems try 2 instead of 3 (the latest ESP Ghostscript package handles Level 3 PostScript very well; Adobe).
Say Yes to PostScript Error Handler (Adobe).
Of course, you can run all the commands that are embedded into the cupsaddsmb convenience utility yourself, one by one, and upload and prepare the driver files for future client downloads.
We are going to do this now. First, read the man page on rpcclient to get a first idea.
Look at all the printing-related subcommands: enumprinters, enumdrivers,
enumports, adddriver, and setdriver are among the
most interesting ones. rpcclient implements an important part of the MS-RPC protocol.
You can use it to query (and command) a Windows NT (or 200x/XP) PC, too. MS-RPC is used by Windows clients,
among other things, to benefit from the Point'n'Print features. Samba can now mimic this as well.
First let's check the rpcclient man page. Here are two relevant passages:
adddriver <arch> <config> Execute an AddPrinterDriver() RPC
to install the printer driver information on the server. The driver files should already exist in the
directory returned by getdriverdir. Possible values for arch are the
same as those for the getdriverdir command. The config parameter is
defined as follows:
Long Printer Name:\
Driver File Name:\
Data File Name:\
Config File Name:\
Help File Name:\
Language Monitor Name:\
Default Data Type:\
Comma Separated list of Files
Any empty fields should be entered as the string “NULL”.
Samba does not need to support the concept of print monitors, since these only apply to local printers whose drivers can use a bidirectional link for communication. This field should be “NULL”. On a remote NT print server, the print monitor for a driver must already be installed before adding the driver or else the RPC will fail.
setdriver <printername> <drivername> Execute a SetPrinter()
command to update the printer driver associated with an installed printer. The printer driver must already be
correctly installed on the print server.
See also the enumprinters and enumdrivers commands to
obtain a list of installed printers and drivers.
The exact format isn't made too clear by the man page, since you have to deal with some parameters containing spaces. Here is a better description for it. We have line-broken the command and indicated the breaks with “\”. Usually you would type the command in one line without the line breaks:
adddriver "Architecture" \
   "LongPrinterName:DriverFile:DataFile:ConfigFile:HelpFile:\
   LanguageMonitorFile:DataType:ListOfFiles,Comma-separated"
What the man pages denote as a simple <config> keyword in reality consists of
eight colon-separated fields. The last field may take multiple (in some very insane cases, even 20 different
additional) files. This might sound confusing at first. What the man pages call the
“LongPrinterName” in reality should be called the “Driver Name”. You can name it
anything you want, as long as you use this name later in the rpcclient ... setdriver
command. For practical reasons, many name the driver the same as the printer.
It isn't simple at all. I hear you asking: “How do I know which files are Driver File”,
“Data File”, “Config File”, “Help File” and “Language Monitor
File in each case?” For an answer, you may want to have a look at how a Windows NT box with a shared
printer presents the files to us. Remember that this whole procedure has to be developed by the Samba Team by
listening to the traffic caused by Windows computers on the wire. We may as well turn to a Windows box now and
access it from a UNIX workstation. We will query it with rpcclient to see what it tells us
and try to understand the man page more clearly.
We could run rpcclient with a getdriver or a
getprinter subcommand (in level 3 verbosity) against it. Just sit down at a UNIX or Linux
workstation with the Samba utilities installed, then type the following command:
root#rpcclient -U'user%secret' NT-SERVER -c 'getdriver printername 3'
From the result it should become clear which is which. Here is an example from my installation:
root#rpcclient -U'Danka%xxxx' W200xSERVER \ -c'getdriver "DANKA InfoStream Virtual Printer" 3'cmd = getdriver "DANKA InfoStream Virtual Printer" 3 [Windows NT x86] Printer Driver Info 3: Version: [2] Driver Name: [DANKA InfoStream] Architecture: [Windows NT x86] Driver Path: [C:\WINNT\System32\spool\DRIVERS\W32X86\2\PSCRIPT.DLL] Datafile: [C:\WINNT\System32\spool\DRIVERS\W32X86\2\INFOSTRM.PPD] Configfile: [C:\WINNT\System32\spool\DRIVERS\W32X86\2\PSCRPTUI.DLL] Helpfile: [C:\WINNT\System32\spool\DRIVERS\W32X86\2\PSCRIPT.HLP] Dependentfiles: [] Dependentfiles: [] Dependentfiles: [] Dependentfiles: [] Dependentfiles: [] Dependentfiles: [] Dependentfiles: [] Monitorname: [] Defaultdatatype: []
Some printer drivers list additional files under the label Dependentfiles, and these
would go into the last field ListOfFiles,Comma-separated. For the CUPS PostScript
drivers, we do not need any (nor would we for the Adobe PostScript driver); therefore, the field will get a
“NULL” entry.
From the man page (and from the quoted output of cupsaddsmb above) it becomes clear that
you need to have certain conditions in order to make the manual uploading and initializing of the driver files
succeed. The two rpcclient subcommands (adddriver and
setdriver) need to encounter the following preconditions to complete successfully:
You are connected as printer admin or root (this is not the “Printer Operators” group in NT, but the printer admin group as defined in the
[global]section ofsmb.conf).Copy all required driver files to
\\SAMBA\print$\w32x86and\\SAMBA\print$\win40as appropriate. They will end up in the “0” respective “2” subdirectories later. For now, do not put them there; they'll be automatically used by theadddriversubcommand. (If you usesmbclientto put the driver files into the share, note that you need to escape the “$”:smbclient //sambaserver/print\$ -U root.)The user you're connecting as must be able to write to the
[print$]share and create subdirectories.The printer you are going to set up for the Windows clients needs to be installed in CUPS already.
The CUPS printer must be known to Samba; otherwise the
setdriversubcommand fails with an NT_STATUS_UNSUCCESSFUL error. To check if the printer is known by Samba, you may use theenumprinterssubcommand torpcclient. A long-standing bug prevented a proper update of the printer list until every smbd process had received a SIGHUP or was restarted. Remember this in case you've created the CUPS printer just recently and encounter problems: try restarting Samba.
We are going to install a printer driver now by manually executing all required commands. Because this may seem a rather complicated process at first, we go through the procedure step by step, explaining every single action item as it comes up.
Procedure 22.2. Manual Driver Installation
Install the printer on CUPS.
root#lpadmin -p mysmbtstprn -v socket://10.160.51.131:9100 -E \ -P canonIR85.ppdThis installs a printer with the name
mysmbtstprnto the CUPS system. The printer is accessed via a socket (a.k.a. JetDirect or Direct TCP/IP) connection. You need to be root for this step.(Optional.) Check if the printer is recognized by Samba.
root#rpcclient -Uroot%xxxx -c 'enumprinters' localhost \ | grep -C2 mysmbtstprnflags:[0x800000] name:[\\kde-bitshop\mysmbtstprn] description:[\\kde-bitshop\mysmbtstprn,,mysmbtstprn] comment:[mysmbtstprn]This should show the printer in the list. If not, stop and restart the Samba daemon (smbd) or send a HUP signal:
root#kill -HUP `pidof smbd`Check again. Troubleshoot and repeat until successful. Note the “empty” field between the two commas in the “description” line. The driver name would appear here if there was one already. You need to know root's Samba password (as set by the
smbpasswdcommand) for this step and most of the following steps. Alternatively, you can authenticate as one of the users from the “write list” as defined insmb.conffor[print$].(Optional.) Check if Samba knows a driver for the printer.
root#rpcclient -Uroot%xxxx -c 'getprinter mysmbtstprn 2'\ localhost | grep driverdrivername:[]root#rpcclient -Uroot%xxxx -c 'getprinter mysmbtstprn 2' \ localhost | grep -C4 drivservername:[\\kde-bitshop] printername:[\\kde-bitshop\mysmbtstprn] sharename:[mysmbtstprn] portname:[Samba Printer Port] drivername:[] comment:[mysmbtstprn] location:[] sepfile:[] printprocessor:[winprint]root#rpcclient -U root%xxxx -c 'getdriver mysmbtstprn' localhostresult was WERR_UNKNOWN_PRINTER_DRIVERNone of the three commands shown above should show a driver. This step was done for the purpose of demonstrating this condition. An attempt to connect to the printer at this stage will prompt a message along the lines of, “The server does not have the required printer driver installed.”
Put all required driver files into Samba's [print$].
root#smbclient //localhost/print\$ -U 'root%xxxx' \ -c 'cd W32X86; \ put /etc/cups/ppd/mysmbtstprn.ppd mysmbtstprn.PPD; \ put /usr/share/cups/drivers/cupsui.dll cupsui.dll; \ put /usr/share/cups/drivers/cupsdrvr.dll cupsdrvr.dll; \ put /usr/share/cups/drivers/cups.hlp cups.hlp'(This command should be entered in one long single line. Line breaks and the line ends indicated by “\” have been inserted for readability reasons.) This step is required for the next one to succeed. It makes the driver files physically present in the
[print$]share. However, clients would still not be able to install them, because Samba does not yet treat them as driver files. A client asking for the driver would still be presented with a “not installed here” message.Verify where the driver files are now.
root#ls -l /etc/samba/drivers/W32X86/total 669 drwxr-sr-x 2 root ntadmin 532 May 25 23:08 2 drwxr-sr-x 2 root ntadmin 670 May 16 03:15 3 -rwxr--r-- 1 root ntadmin 14234 May 25 23:21 cups.hlp -rwxr--r-- 1 root ntadmin 278380 May 25 23:21 cupsdrvr.dll -rwxr--r-- 1 root ntadmin 215848 May 25 23:21 cupsui.dll -rwxr--r-- 1 root ntadmin 169458 May 25 23:21 mysmbtstprn.PPDThe driver files now are in the W32X86 architecture “root” of
[print$].Tell Samba that these are driver files (
adddriver).root#rpcclient -Uroot%xxxx -c 'adddriver "Windows NT x86" \ "mydrivername:cupsdrvr.dll:mysmbtstprn.PPD: \ cupsui.dll:cups.hlp:NULL:RAW:NULL"' \ localhostPrinter Driver mydrivername successfully installed.You cannot repeat this step if it fails. It could fail even as a result of a simple typo. It will most likely have moved a part of the driver files into the “2” subdirectory. If this step fails, you need to go back to the fourth step and repeat it before you can try this one again. In this step, you need to choose a name for your driver. It is normally a good idea to use the same name as is used for the printer name; however, in big installations you may use this driver for a number of printers that obviously have different names, so the name of the driver is not fixed.
Verify where the driver files are now.
root#ls -l /etc/samba/drivers/W32X86/total 1 drwxr-sr-x 2 root ntadmin 532 May 25 23:22 2 drwxr-sr-x 2 root ntadmin 670 May 16 03:15 3root#ls -l /etc/samba/drivers/W32X86/2total 5039 [....] -rwxr--r-- 1 root ntadmin 14234 May 25 23:21 cups.hlp -rwxr--r-- 1 root ntadmin 278380 May 13 13:53 cupsdrvr.dll -rwxr--r-- 1 root ntadmin 215848 May 13 13:53 cupsui.dll -rwxr--r-- 1 root ntadmin 169458 May 25 23:21 mysmbtstprn.PPDNotice how step 6 also moved the driver files to the appropriate subdirectory. Compare this with the situation after step 5.
(Optional.) Verify if Samba now recognizes the driver.
root#rpcclient -Uroot%xxxx -c 'enumdrivers 3' \ localhost | grep -B2 -A5 mydrivernamePrinter Driver Info 3: Version: [2] Driver Name: [mydrivername] Architecture: [Windows NT x86] Driver Path: [\\kde-bitshop\print$\W32X86\2\cupsdrvr.dll] Datafile: [\\kde-bitshop\print$\W32X86\2\mysmbtstprn.PPD] Configfile: [\\kde-bitshop\print$\W32X86\2\cupsui.dll] Helpfile: [\\kde-bitshop\print$\W32X86\2\cups.hlp]Remember, this command greps for the name you chose for the driver in step 6. This command must succeed before you can proceed.
Tell Samba which printer should use these driver files (
setdriver).root#rpcclient -Uroot%xxxx -c 'setdriver mysmbtstprn mydrivername' \ localhostSuccessfully set mysmbtstprn to driver mydrivernameSince you can bind any printer name (print queue) to any driver, this is a convenient way to set up many queues that use the same driver. You do not need to repeat all the previous steps for the setdriver command to succeed. The only preconditions are that
enumdriversmust find the driver andenumprintersmust find the printer.(Optional) Verify if Samba has recognized this association.
root#rpcclient -Uroot%xxxx -c 'getprinter mysmbtstprn 2' localhost \ | grep driverdrivername:[mydrivername]root#rpcclient -Uroot%xxxx -c 'getprinter mysmbtstprn 2' localhost \ | grep -C4 drivservername:[\\kde-bitshop] printername:[\\kde-bitshop\mysmbtstprn] sharename:[mysmbtstprn] portname:[Done] drivername:[mydrivername] comment:[mysmbtstprn] location:[] sepfile:[] printprocessor:[winprint]root#rpcclient -U root%xxxx -c 'getdriver mysmbtstprn' localhost[Windows NT x86] Printer Driver Info 3: Version: [2] Driver Name: [mydrivername] Architecture: [Windows NT x86] Driver Path: [\\kde-bitshop\print$\W32X86\2\cupsdrvr.dll] Datafile: [\\kde-bitshop\print$\W32X86\2\mysmbtstprn.PPD] Configfile: [\\kde-bitshop\print$\W32X86\2\cupsui.dll] Helpfile: [\\kde-bitshop\print$\W32X86\2\cups.hlp] Monitorname: [] Defaultdatatype: [RAW] Monitorname: [] Defaultdatatype: [RAW]root#rpcclient -Uroot%xxxx -c 'enumprinters' localhost \ | grep mysmbtstprnname:[\\kde-bitshop\mysmbtstprn] description:[\\kde-bitshop\mysmbtstprn,mydrivername,mysmbtstprn] comment:[mysmbtstprn]Compare these results with the ones from steps 2 and 3. Every one of these commands show the driver is installed. Even the
enumprinterscommand now lists the driver on the “description” line.(Optional.) Tickle the driver into a correct device mode.
You certainly know how to install the driver on the client. In case you are not particularly familiar with Windows, here is a short recipe: Browse the Network Neighborhood, go to the Samba server, and look for the shares. You should see all shared Samba printers. Double-click on the one in question. The driver should get installed and the network connection set up. Another way is to open the Printers (and Faxes) folder, right-click on the printer in question, and select Connect or Install. As a result, a new printer should appear in your client's local Printers (and Faxes) folder, named something like printersharename on Sambahostname.
It is important that you execute this step as a Samba printer admin (as defined in
smb.conf). Here is another method to do this on Windows XP. It uses a command line, which you may type into the “DOS box” (type root's smbpassword when prompted):C:\>runas /netonly /user:root "rundll32 printui.dll,PrintUIEntry \ /in /n \\sambaserver\mysmbtstprn"Change any printer setting once (like changing portrait to landscape), click on , and change the setting back.
Install the printer on a client (Point'n'Print).
C:\>rundll32 printui.dll,PrintUIEntry /in /n "\\sambaserver\mysmbtstprn"If it does not work, it could be a permissions problem with the
[print$]share.(Optional) Print a test page.
C:\>rundll32 printui.dll,PrintUIEntry /p /n "\\sambaserver\mysmbtstprn"Then hit [TAB] five times, [ENTER] twice, [TAB] once, and [ENTER] again, and march to the printer.
(Recommended.) Study the test page.
Hmmm. Just kidding! By now you know everything about printer installations and you do not need to read a word. Just put it in a frame and bolt it to the wall with the heading "MY FIRST RPCCLIENT-INSTALLED PRINTER" why not just throw it away!
(Obligatory.) Enjoy. Jump. Celebrate your success.
root#echo "Cheeeeerioooooo! Success..." >> /var/log/samba/log.smbd
The setdriver command will fail if in Samba's mind the queue is not already there. A successful installation displys the promising message that the:
Printer Driver ABC successfully installed.
following the adddriver parts of the procedure. But you may also see
a disappointing message like this one:
result was NT_STATUS_UNSUCCESSFUL
It is not good enough that you can see the queue in CUPS, using the lpstat -p ir85wm
command. A bug in most recent versions of Samba prevents the proper update of the queue list. The recognition
of newly installed CUPS printers fails unless you restart Samba or send a HUP to all smbd processes. To verify
if this is the reason why Samba does not execute the setdriver command successfully, check
if Samba “sees” the printer:
root#rpcclient transmeta -N -U'root%xxxx' -c 'enumprinters 0'|grep ir85wmprintername:[ir85wm]
An alternate command could be this:
root#rpcclient transmeta -N -U'root%secret' -c 'getprinter ir85wm'cmd = getprinter ir85wm flags:[0x800000] name:[\\transmeta\ir85wm] description:[\\transmeta\ir85wm,ir85wm,DPD] comment:[CUPS PostScript-Treiber for Windows NT/200x/XP]
By the way, you can use these commands, plus a few more, of course, to install drivers on remote Windows NT print servers too!
Some mystery is associated with the series of files with a tdb suffix appearing in every Samba installation.
They are connections.tdb, printing.tdb,
share_info.tdb, ntdrivers.tdb, unexpected.tdb,
brlock.tdb, locking.tdb, ntforms.tdb,
messages.tdb , ntprinters.tdb, sessionid.tdb,
and secrets.tdb. What is their purpose?
A Windows NT (print) server keeps track of all information needed to serve its duty toward its clients by
storing entries in the Windows registry. Client queries are answered by reading from the registry,
Administrator or user configuration settings that are saved by writing into the registry. Samba and UNIX
obviously do not have such a Registry. Samba instead keeps track of all client-related information in a series
of *.tdb files. (TDB stands for trivial data base). These are often located in
/var/lib/samba/ or /var/lock/samba/. The printing-related files are
ntprinters.tdb, printing.tdb,ntforms.tdb, and
ntdrivers.tdb.
*.tdb files are not human readable. They are written in a binary format. “Why not
ASCII?”, you may ask. “After all, ASCII configuration files are a good and proven tradition on
UNIX.” The reason for this design decision by the Samba Team is mainly performance. Samba needs to be
fast; it runs a separate smbd process for each client connection, in some environments many
thousands of them. Some of these smbds might need to write-access the same
*.tdb file at the same time. The file format of Samba's
*.tdb files allows for this provision. Many smbd processes may write to the same
*.tdb file at the same time. This wouldn't be possible with pure ASCII files.
It is very important that all *.tdb files remain consistent over all write and read
accesses. However, it may happen that these files do get corrupted. (A kill -9
`pidof smbd' while a write access is in progress could do the damage, as could a power interruption,
etc.). In cases of trouble, a deletion of the old printing-related *.tdb files may be the
only option. After that, you need to re-create all print-related setups unless you have made a backup of the
*.tdb files in time.
Samba ships with a little utility that helps the root user of your system to backup your
*.tdb files. If you run it with no argument, it prints a usage message:
root#tdbbackupUsage: tdbbackup [options] <fname...> Version:3.0a -h this help message -s suffix set the backup suffix -v verify mode (restore if corrupt)
Here is how I backed up my printing.tdb file:
root#ls. browse.dat locking.tdb ntdrivers.tdb printing.tdb .. share_info.tdb connections.tdb messages.tdb ntforms.tdb printing.tdbkp unexpected.tdb brlock.tdb gmon.out namelist.debug ntprinters.tdb sessionid.tdbroot#tdbbackup -s .bak printing.tdbprinting.tdb : 135 recordsroot#ls -l printing.tdb*-rw------- 1 root root 40960 May 2 03:44 printing.tdb -rw------- 1 root root 40960 May 2 03:44 printing.tdb.bak
CUPS ships with good support for HP LaserJet-type printers. You can install the generic driver as follows:
root#lpadmin -p laserjet4plus -v parallel:/dev/lp0 -E -m laserjet.ppd
The -m switch will retrieve the laserjet.ppd from the standard
repository for not-yet-installed PPDs, which CUPS typically stores in
/usr/share/cups/model. Alternatively, you may use -P /path/to/your.ppd.
The generic laserjet.ppd, however, does not support every special option for every
LaserJet-compatible model. It constitutes a sort of “least common denominator” of all the models.
If for some reason you must pay for the commercially available ESP Print Pro drivers, your first move should
be to consult the database on the Linuxprinting Web site. Linuxprinting.org has
excellent recommendations about which driver is best used for each printer. Its database is kept current by
the tireless work of Till Kamppeter from Mandrakesoft, who is also the principal author of the
foomatic-rip utility.
Note
The former cupsomatic concept is now being replaced by the new successor, a much more
powerful foomatic-rip. cupsomatic is no longer maintained. Here is the
new URL to the Foomatic-3.0
database. If you upgrade to foomatic-rip, remember to also upgrade to the new-style PPDs
for your Foomatic-driven printers. foomatic-rip will not work with PPDs generated for the old
cupsomatic. The new-style PPDs are 100% compliant with the Adobe PPD specification. They
are also intended to be used by Samba and the cupsaddsmb utility, to provide the driver files for the Windows
clients!
Nowadays, most Linux distributions rely on the utilities from the Linuxprinting.org to create their printing-related software (which, by the way, works on all UNIXes and on Mac OS X and Darwin, too). The utilities from this sire have a very end-user-friendly interface that allows for an easy update of drivers and PPDs for all supported models, all spoolers, all operating systems, and all package formats (because there is none). Its history goes back a few years.
Recently, Foomatic has achieved the astonishing milestone of 1,000 listed printer models. Linuxprinting.org keeps all the important facts about printer drivers, supported models, and which options are available for the various driver/printer combinations in its Foomatic database. Currently there are 245 drivers in the database. Many drivers support various models, and many models may be driven by different drivers its your choice!
At present, there are 690 devices dubbed as working perfectly: 181 are mostly perfect, 96 are partially perfect, and 46 are paperweights. Keeping in mind that most of these are non-PostScript models (PostScript printers are automatically supported by CUPS to perfection by using their own manufacturer-provided Windows PPD), and that a multifunctional device never qualifies as working perfectly if it does not also scan and copy and fax under GNU/Linux then this is a truly astonishing achievement! Three years ago the number was not more than 500, and Linux or UNIX printing at the time wasn't anywhere near the quality it is today.
A few years ago Grant Taylor started it all. The roots of today's Linuxprinting.org are in the first Linux Printing HOWTO that he authored. As a side-project to this document, which served many Linux users and admins to guide their first steps in this complicated and delicate setup (to a scientist, printing is “applying a structured deposition of distinct patterns of ink or toner particles on paper substrates”), he started to build in a little Postgres database with information about the hardware and driver zoo that made up Linux printing of the time. This database became the core component of today's Foomatic collection of tools and data. In the meantime, it has moved to an XML representation of the data.
“Why the funny name?” you ask. When it really took off, around spring 2000, CUPS was far less
popular than today, and most systems used LPD, LPRng, or even PDQ to print. CUPS shipped with a few generic
drivers (good for a few hundred different printer models). These didn't support many device-specific options.
CUPS also shipped with its own built-in rasterization filter (pstoraster, derived from
Ghostscript). On the other hand, CUPS provided brilliant support for controlling all
printer options through standardized and well-defined PPD files. Plus, CUPS was designed to be easily
extensible.
Taylor already had in his database a respectable compilation of facts about many more printers and the Ghostscript “drivers” they run with. His idea, to generate PPDs from the database information and use them to make standard Ghostscript filters work within CUPS, proved to work very well. It also killed several birds with one stone:
It made all current and future Ghostscript filter developments available for CUPS.
It made available a lot of additional printer models to CUPS users (because often the traditional Ghostscript way of printing was the only one available).
It gave all the advanced CUPS options (Web interface, GUI driver configurations) to users wanting (or needing) to use Ghostscript filters.
CUPS worked through a quickly hacked-up filter script named cupsomatic. cupsomatic ran the printfile through Ghostscript, constructing automatically the rather complicated command line needed. It just needed to be copied into the CUPS system to make it work. To configure the way cupsomatic controls the Ghostscript rendering process, it needs a CUPS-PPD. This PPD is generated directly from the contents of the database. For CUPS and the respective printer/filter combo, another Perl script named CUPS-O-Matic did the PPD generation. After that was working, Taylor implemented within a few days a similar thing for two other spoolers. Names chosen for the config-generator scripts were PDQ-O-Matic (for PDQ) and LPD-O-Matic (for you guessed it LPD); the configuration here didn't use PPDs but other spooler-specific files.
From late summer of that year, Till Kamppeter started to put work into the database. Kamppeter had been newly employed by Mandrakesoft to convert its printing system over to CUPS, after they had seen his FLTK-based XPP (a GUI front-end to the CUPS lp-command). He added a huge amount of new information and new printers. He also developed the support for other spoolers, like PPR (via ppromatic), GNUlpr, and LPRng (both via an extended lpdomatic) and spooler-less printing (directomatic).
So, to answer your question, “Foomatic” is the general name for all the overlapping code and data behind the “*omatic” scripts. Foomatic, up to versions 2.0.x, required (ugly) Perl data structures attached to Linuxprinting.org PPDs for CUPS. It had a different “*omatic” script for every spooler, as well as different printer configuration files.
This has all changed in Foomatic versions 2.9 (beta) and released as “stable” 3.0. It has now achieved the convergence of all *omatic scripts and is called the foomatic-rip. This single script is the unification of the previously different spooler-specific *omatic scripts. foomatic-rip is used by all the different spoolers alike, and because it can read PPDs (both the original PostScript printer PPDs and the Linuxprinting.org-generated ones), all of a sudden all supported spoolers can have the power of PPDs at their disposal. Users only need to plug foomatic-rip into their system. For users there is improved media type and source support paper sizes and trays are easier to configure.
Also, the new generation of Linuxprinting.org PPDs no longer contains Perl data structures. If you are a distro maintainer and have used the previous version of Foomatic, you may want to give the new one a spin, but remember to generate a new-version set of PPDs via the new foomatic-db-engine!. Individual users just need to generate a single new PPD specific to their model by following the steps outlined in the Foomatic tutorial or in this chapter. This new development is truly amazing.
foomatic-rip is a very clever wrapper around the need to run Ghostscript with a different syntax, options, device selections, and/or filters for each different printer or spooler. At the same time, it can read the PPD associated with a print queue and modify the print job according to the user selections. Together with this comes the 100% compliance of the new Foomatic PPDs with the Adobe spec. Some innovative features of the Foomatic concept may surprise users. It will support custom paper sizes for many printers and will support printing on media drawn from different paper trays within the same job (in both cases, even where there is no support for this from Windows-based vendor printer drivers).
Most driver development itself does not happen within Linuxprinting.org. Drivers are written by independent maintainers. Linuxprinting.org just pools all the information and stores it in its database. In addition, it also provides the Foomatic glue to integrate the many drivers into any modern (or legacy) printing system known to the world.
Speaking of the different driver development groups, most of the work is currently done in three projects:
Omni a free software project by IBM that tries to convert its printer driver knowledge from good-ol' OS/2 times into a modern, modular, universal driver architecture for Linux/UNIX (still beta). This currently supports 437 models.
HPIJS a free software project by HP to provide the support for its own range of models (very mature, printing in most cases is perfect and provides true photo quality). This currently supports 369 models.
Gutenprint a free software effort, started by Michael Sweet (also lead developer for CUPS), now directed by Robert Krawitz, which has achieved an amazing level of photo print quality (many Epson users swear that its quality is better than the vendor drivers provided by Epson for the Microsoft platforms). This currently supports 522 models.
Linuxprinting.org today is the one-stop shop to download printer drivers. Look for printer information and tutorials or solve printing problems in its popular forums. This forum is not just for GNU/Linux users, but admins of commercial UNIX systems are also going there, and the relatively new Mac OS X forum has turned out to be one of the most frequented forums after only a few weeks.
Linuxprinting.org and the Foomatic driver wrappers around Ghostscript are now a standard tool-chain for printing on all the important distros. Most of them also have CUPS underneath. While in recent years most printer data had been added by Kamppeter, many additional contributions came from engineers with SuSE, Red Hat, Conectiva, Debian, and others. Vendor-neutrality is an important goal of the Foomatic project. Mandrake and Conectiva have merged and are now called Mandriva.
Note
Till Kamppeter from Mandrakesoft is doing an excellent job in his spare time to maintain Linuxprinting.org and Foomatic. So if you use it often, please send him a note showing your appreciation.
The Foomatic database is an amazing piece of ingenuity in itself. Not only does it keep the printer and driver
information, but it is organized in a way that it can generate PPD files on the fly from its internal
XML-based datasets. While these PPDs are modeled to the Adobe specification of PPDs, the
Linuxprinting.org/Foomatic-PPDs do not normally drive PostScript printers. They are used to describe all the
bells and whistles you could ring or blow on an Epson Stylus inkjet, or an HP Photosmart, or what-have-you.
The main trick is one little additional line, not envisaged by the PPD specification, starting with the
*cupsFilter keyword. It tells the CUPS daemon how to proceed with the PostScript print
file (old-style Foomatic-PPDs named the cupsomatic filter script, while the new-style PPDs are now call
foomatic-rip). This filter script calls Ghostscript on the host system (the recommended variant is ESP
Ghostscript) to do the rendering work. foomatic-rip knows which filter or internal device setting it should
ask from Ghostscript to convert the PostScript print job into a raster format ready for the target device.
This usage of PPDs to describe the options of non-PostScript printers was the invention of the CUPS
developers. The rest is easy. GUI tools (like KDE's marvelous kprinter or the GNOME gtklp xpp and the CUPS Web interface) read the PPD as well and use
this information to present the available settings to the user as an intuitive menu selection.
Here are the steps to install a foomatic-rip-driven LaserJet 4 Plus-compatible
printer in CUPS (note that recent distributions of SuSE, UnitedLinux and
Mandrake may ship with a complete package of Foomatic-PPDs plus the
foomatic-rip utility. Going directly to
Linuxprinting.org ensures that you get the latest driver/PPD files).
Open your browser at the Linuxprinting.org printer list page.
Check the complete list of printers in the database..
Select your model and click on the link.
You'll arrive at a page listing all drivers working with this model (for all printers, there will always be one recommended driver. Try this one first).
In our case (HP LaserJet 4 Plus), we'll arrive at the default driver for the HP-LaserJet 4 Plus.
The recommended driver is ljet4.
Several links are provided here. You should visit them all if you are not familiar with the Linuxprinting.org database.
There is a link to the database page for the ljet4. On the driver's page, you'll find important and detailed information about how to use that driver within the various available spoolers.
Another link may lead you to the home page of the author of the driver.
Important links are the ones that provide hints with setup instructions for CUPS; PDQ; LPD, LPRng, and GNUlpr); as well as PPR or “spoolerless” printing.
You can view the PPD in your browser through this link: http://www.linuxprinting.org/ppd-o-matic.cgi?driver=ljet4&printer=HP-LaserJet_4_Plus&show=1
Most importantly, you can also generate and download the PPD.
The PPD contains all the information needed to use our model and the driver; once installed, this works transparently for the user. Later you'll only need to choose resolution, paper size, and so on, from the Web-based menu, or from the print dialog GUI, or from the command line.
If you ended up on the drivers page, you can choose to use the “PPD-O-Matic” online PPD generator program.
Select the exact model and check either Download or Display PPD file and click Generate PPD file.
If you save the PPD file from the browser view, please do not use cut and paste (since it could possibly damage line endings and tabs, which makes the PPD likely to fail its duty), but use in your browser's menu. (It is best to use the Download option directly from the Web page.)
Another interesting part on each driver page is the button. If you select your printer model and click on that button, a complete Ghostscript command line will be displayed, enumerating all options available for that combination of driver and printer model. This is a great way to “learn Ghostscript by doing”. It is also an excellent cheat sheet for all experienced users who need to reconstruct a good command line for that darned printing script, but can't remember the exact syntax.
Sometime during your visit to Linuxprinting.org, save the PPD to a suitable place on your hard disk, say
/path/to/my-printer.ppd(if you prefer to install your printers with the help of the CUPS Web interface, save the PPD to the/usr/share/cups/model/path and restart cupsd).Then install the printer with a suitable command line, like this:
root#lpadmin -p laserjet4plus -v parallel:/dev/lp0 -E \ -P path/to/my-printer.ppdFor all the new-style “Foomatic-PPDs” from Linuxprinting.org, you also need a special CUPS filter named foomatic-rip.
The foomatic-rip Perl script itself also makes some interesting reading because it is well documented by Kamppeter's in-line comments (even non-Perl hackers will learn quite a bit about printing by reading it).
Save foomatic-rip either directly in
/usr/lib/cups/filter/foomatic-ripor somewhere in your $PATH (and remember to make it world-executable). Again, do not save by copy and paste but use the appropriate link or the menu item in your browser.If you save foomatic-rip in your $PATH, create a symlink:
root#cd /usr/lib/cups/filter/ ; ln -s `which foomatic-rip'CUPS will discover this new available filter at startup after restarting cupsd.
Once you print to a print queue set up with the Foomatic PPD, CUPS will insert the appropriate commands and comments into the resulting PostScript job file. foomatic-rip is able to read and act upon these and uses some specially encoded Foomatic comments embedded in the job file. These in turn are used to construct (transparently for you, the user) the complicated Ghostscript command line telling the printer driver exactly how the resulting raster data should look and which printer commands to embed into the data stream. You need:
A “foomatic+something” PPD but this is not enough to print with CUPS (it is only one important component).
The
foomatic-ripfilter script (Perl) in/usr/lib/cups/filters/.Perl to make foomatic-rip run.
Ghostscript (because it is doing the main work, controlled by the PPD/foomatic-rip combo) to produce the raster data fit for your printer model's consumption.
Ghostscript must (depending on the driver/model) contain support for a certain device representing the selected driver for your model (as shown by
gs -h).foomatic-rip needs a new version of PPDs (PPD versions produced for cupsomatic do not work with foomatic-rip).
Often there are questions regarding print quotas where Samba users (that is, Windows clients) should not be able to print beyond a certain number of pages or data volume per day, week, or month. This feature is dependent on the real print subsystem you're using. Samba's part is always to receive the job files from the clients (filtered or unfiltered) and hand them over to this printing subsystem.
Of course one could hack things with one's own scripts. But then there is CUPS. CUPS supports quotas that can be based on the size of jobs or on the number of pages or both, and can span any time period you want.
This is an example command of how root would set a print quota in CUPS, assuming an existing printer named “quotaprinter”:
root#lpadmin -p quotaprinter -o job-quota-period=604800 \ -o job-k-limit=1024 -o job-page-limit=100
This would limit every single user to print no more than 100 pages or 1024 KB of data (whichever comes first) within the last 604,800 seconds ( = 1 week).
For CUPS to count correctly, the printfile needs to pass the CUPS pstops filter; otherwise it uses a dummy count of “one”. Some print files do not pass it (e.g., image files), but then those are mostly one-page jobs anyway. This also means that proprietary drivers for the target printer running on the client computers and CUPS/Samba, which then spool these files as “raw” (i.e., leaving them untouched, not filtering them), will be counted as one-pagers too!
You need to send PostScript from the clients (i.e., run a PostScript driver there) to have the chance to get accounting done. If the printer is a non-PostScript model, you need to let CUPS do the job to convert the file to a print-ready format for the target printer. This is currently working for about a thousand different printer models. Linuxprinting.org has a driver list.
Before CUPS 1.1.16, your only option was to use the Adobe PostScript driver on the Windows clients. The output
of this driver was not always passed through the pstops filter on the CUPS/Samba side, and
therefore was not counted correctly (the reason is that it often, depending on the PPD being used, wrote a
PJL-header in front of the real PostScript, which caused CUPS to skip pstops and go
directly to the pstoraster stage).
From CUPS 1.1.16 and later releases, you can use the CUPS PostScript driver for Windows NT/200x/XP
clients (which is tagged in the download area of http://www.cups.org/ as the
cups-samba-1.1.16.tar.gz package). It does not work for Windows
9x/Me clients, but it guarantees:
You can read more about the setup of this combination in the man page for cupsaddsmb (which
is only present with CUPS installed, and only current from CUPS 1.1.16).
These are the items CUPS logs in the page_log for every page of a job:
Printer name
User name
Job ID
Time of printing
Page number
Number of copies
A billing information string (optional)
The host that sent the job (included since version 1.1.19)
Here is an extract of my CUPS server's page_log file to illustrate the
format and included items:
tec_IS2027 kurt 401 [22/Apr/2003:10:28:43 +0100] 1 3 #marketing 10.160.50.13
tec_IS2027 kurt 401 [22/Apr/2003:10:28:43 +0100] 2 3 #marketing 10.160.50.13
tec_IS2027 kurt 401 [22/Apr/2003:10:28:43 +0100] 3 3 #marketing 10.160.50.13
tec_IS2027 kurt 401 [22/Apr/2003:10:28:43 +0100] 4 3 #marketing 10.160.50.13
Dig9110 boss 402 [22/Apr/2003:10:33:22 +0100] 1 440 finance-dep 10.160.51.33
This was job ID 401, printed on tec_IS2027
by user kurt, a 64-page job printed in three copies, billed to
#marketing, and sent from IP address 10.160.50.13.
The next job had ID 402, was sent by user boss
from IP address 10.160.51.33, printed from one page 440 copies, and
is set to be billed to finance-dep.
What flaws or shortcomings are there with this quota system?
The ones named above (wrongly logged job in case of printer hardware failure, and so on).
In reality, CUPS counts the job pages that are being processed in software (that is, going through the RIP) rather than the physical sheets successfully leaving the printing device. Thus, if there is a jam while printing the fifth sheet out of 1,000 and the job is aborted by the printer, the page count will still show the figure of 1,000 for that job.
All quotas are the same for all users (no flexibility to give the boss a higher quota than the clerk) and no support for groups.
No means to read out the current balance or the “used-up” number of current quota.
A user having used up 99 sheets of a 100 quota will still be able to send and print a 1,000 sheet job.
A user being denied a job because of a filled-up quota does not get a meaningful error message from CUPS other than “client-error-not-possible”.
This is the best system currently available, and there are huge improvements under development for CUPS 1.2:
Page counting will go into the backends (these talk directly to the printer and will increase the count in sync with the actual printing process; thus, a jam at the fifth sheet will lead to a stop in the counting).
Quotas will be handled more flexibly.
Probably there will be support for users to inquire about their accounts in advance.
Probably there will be support for some other tools around this topic.
A printer queue with no PPD associated to it is a
“raw” printer, and all files will go directly there as received by the
spooler. The exceptions are file types application/octet-stream
that need the pass-through feature enabled. “Raw” queues do not do any
filtering at all; they hand the file directly to the CUPS backend.
This backend is responsible for sending the data to the device
(as in the “device URI” notation: lpd://, socket://,
smb://, ipp://, http://, parallel:/, serial:/, usb:/, and so on).
cupsomatic/Foomatic are not native CUPS drivers
and they do not ship with CUPS. They are a third-party add-on
developed at Linuxprinting.org. As such, they are a brilliant hack to
make all models (driven by Ghostscript drivers/filters in traditional
spoolers) also work via CUPS, with the same (good or bad!) quality as
in these other spoolers. cupsomatic is only a vehicle to execute a
Ghostscript command line at that stage in the CUPS filtering chain
where normally the native CUPS pstoraster filter would kick
in. cupsomatic bypasses pstoraster, kidnaps the print file from CUPS,
and redirects it to go through Ghostscript. CUPS accepts this
because the associated cupsomatic/foomatic-PPD specifies:
*cupsFilter: "application/vnd.cups-postscript 0 cupsomatic"
This line persuades CUPS to hand the file to cupsomatic once it has
successfully converted it to the MIME type
application/vnd.cups-postscript. This conversion will not happen for
jobs arriving from Windows that are autotyped
application/octet-stream, with the according changes in
/etc/cups/mime.types in place.
CUPS is widely configurable and flexible, even regarding its filtering
mechanism. Another workaround in some situations would be to have in
/etc/cups/mime.types entries as follows:
application/postscript           application/vnd.cups-raw  0  -
application/vnd.cups-postscript  application/vnd.cups-raw  0  -
This would prevent all PostScript files from being filtered (rather, they will through the virtual nullfilter denoted with “-”). This could only be useful for PostScript printers. If you want to print PostScript code on non-PostScript printers (provided they support ASCII text printing), an entry as follows could be useful:
*/* application/vnd.cups-raw 0 -
and would effectively send all files to the backend without further processing.
You could have the following entry:
application/vnd.cups-postscript application/vnd.cups-raw 0 \
	my_PJL_stripping_filter
You will need to write a my_PJL_stripping_filter
(which could be a shell script) that parses the PostScript and removes the
unwanted PJL. This needs to conform to CUPS filter design
(mainly, receive and pass the parameters printername, job-id,
username, jobtitle, copies, print options, and possibly the
filename). It is installed as world executable into
/usr/lib/cups/filters/ and is called by CUPS
if it encounters a MIME type application/vnd.cups-postscript.
CUPS can handle -o job-hold-until=indefinite.
This keeps the job in the queue on hold. It will only be printed
upon manual release by the printer operator. This is a requirement in
many central reproduction departments, where a few operators manage
the jobs of hundreds of users on some big machine, where no user is
allowed to have direct access (such as when the operators often need
to load the proper paper type before running the 10,000 page job
requested by marketing for the mailing, and so on).
Samba print files pass through two spool directories. One is the incoming directory managed by Samba (set in
the path = /var/spool/samba directive in the [printers] section of smb.conf). The other is the spool directory of your UNIX print subsystem. For
CUPS it is normally /var/spool/cups/, as set by the cupsd.conf
directive RequestRoot /var/spool/cups.
Some important parameter settings in the CUPS configuration file
cupsd.conf are:
- PreserveJobHistory Yes
This keeps some details of jobs in cupsd's mind (well, it keeps the c12345, c12346, and so on, files in the CUPS spool directory, which does a similar job as the old-fashioned BSD-LPD control files). This is set to “Yes” as a default.
- PreserveJobFiles Yes
This keeps the job files themselves in cupsd's mind (it keeps the d12345, d12346, etc., files in the CUPS spool directory). This is set to “No” as the CUPS default.
- “MaxJobs 500”
This directive controls the maximum number of jobs that are kept in memory. Once the number of jobs reaches the limit, the oldest completed job is automatically purged from the system to make room for the new one. If all of the known jobs are still pending or active, then the new job will be rejected. Setting the maximum to 0 disables this functionality. The default setting is 0.
(There are also additional settings for MaxJobsPerUser and
MaxJobsPerPrinter.)
For everything to work as it should, you need to have three things:
A Samba smbd that is compiled against
libcups(check on Linux by runningldd `which smbd').A Samba-
smb.confsetting of printing = cups.Another Samba
smb.confsetting of printcap = cups.
Note
In this case, all other manually set printing-related commands (like print command, lpq command, lprm command, lppause command, and lpresume command) are ignored, and they should normally have no influence whatsoever on your printing.
If you want to do things manually, replace the printing = cups by printing = bsd. Then your manually set commands may work (I haven't tested this), and a print command = lp -d %P %s; rm %s may do what you need.
From time to time the question arises, how can you print to a Windows-attached printer
from Samba? Normally the local connection from Windows host to printer would be done by
USB or parallel cable, but this does not matter to Samba. From here only an SMB connection needs to be opened
to the Windows host. Of course, this printer must be shared first. As you have learned by now, CUPS uses
backends to talk to printers and other servers. To talk to Windows shared printers, you
need to use the smb (surprise, surprise!) backend. Check if this is in the CUPS backend
directory. This usually resides in /usr/lib/cups/backend/. You need to find an
smb file there. It should be a symlink to smbspool, and the file
must exist and be executable:
root#ls -l /usr/lib/cups/backend/total 253 drwxr-xr-x 3 root root 720 Apr 30 19:04 . drwxr-xr-x 6 root root 125 Dec 19 17:13 .. -rwxr-xr-x 1 root root 10692 Feb 16 21:29 canon -rwxr-xr-x 1 root root 10692 Feb 16 21:29 epson lrwxrwxrwx 1 root root 3 Apr 17 22:50 http -> ipp -rwxr-xr-x 1 root root 17316 Apr 17 22:50 ipp -rwxr-xr-x 1 root root 15420 Apr 20 17:01 lpd -rwxr-xr-x 1 root root 8656 Apr 20 17:01 parallel -rwxr-xr-x 1 root root 2162 Mar 31 23:15 pdfdistiller lrwxrwxrwx 1 root root 25 Apr 30 19:04 ptal -> /usr/sbin/ptal-cups -rwxr-xr-x 1 root root 6284 Apr 20 17:01 scsi lrwxrwxrwx 1 root root 17 Apr 2 03:11 smb -> /usr/bin/smbspool -rwxr-xr-x 1 root root 7912 Apr 20 17:01 socket -rwxr-xr-x 1 root root 9012 Apr 20 17:01 usbroot#ls -l `which smbspool`-rwxr-xr-x 1 root root 563245 Dec 28 14:49 /usr/bin/smbspool
If this symlink does not exist, create it:
root#ln -s `which smbspool` /usr/lib/cups/backend/smb
smbspool was written by Mike Sweet from the CUPS folks. It is included and ships with
Samba. It may also be used with print subsystems other than CUPS, to spool jobs to Windows printer shares. To
set up printer winprinter on CUPS, you need to have a driver for it. Essentially
this means to convert the print data on the CUPS/Samba host to a format that the printer can digest (the
Windows host is unable to convert any files you may send). This also means you should be able to print to the
printer if it were hooked directly at your Samba/CUPS host. For troubleshooting purposes, this is what you
should do to determine if that part of the process chain is in order. Then proceed to fix the network
connection/authentication to the Windows host, and so on.
To install a printer with the smb backend on CUPS, use this command:
root#lpadmin -p winprinter -v smb://WINDOWSNETBIOSNAME/printersharename \ -P /path/to/PPD
The PPD must be able to direct CUPS to generate the print data for the target model. For PostScript printers,
just use the PPD that would be used with the Windows NT PostScript driver. But what can you do if the printer
is only accessible with a password? Or if the printer's host is part of another workgroup? This is provided
for: You can include the required parameters as part of the smb:// device-URI like this:
smb://WORKGROUP/WINDOWSNETBIOSNAME/printersharenamesmb://username:password@WORKGROUP/WINDOWSNETBIOSNAME/printersharenamesmb://username:password@WINDOWSNETBIOSNAME/printersharename
Note that the device URI will be visible in the process list of the Samba server (e.g., when someone uses the
ps -aux command on Linux), even if the username and passwords are sanitized before they get
written into the log files. This is an inherently insecure option; however, it is the only one. Don't use it
if you want to protect your passwords. Better share the printer in a way that does not require a password!
Printing will only work if you have a working NetBIOS name resolution up and running. Note that this is a
feature of CUPS and you do not necessarily need to have smbd running.
The diagrams in Filtering Chain 1 and Filtering Chain with cupsomatic show how CUPS handles print jobs.
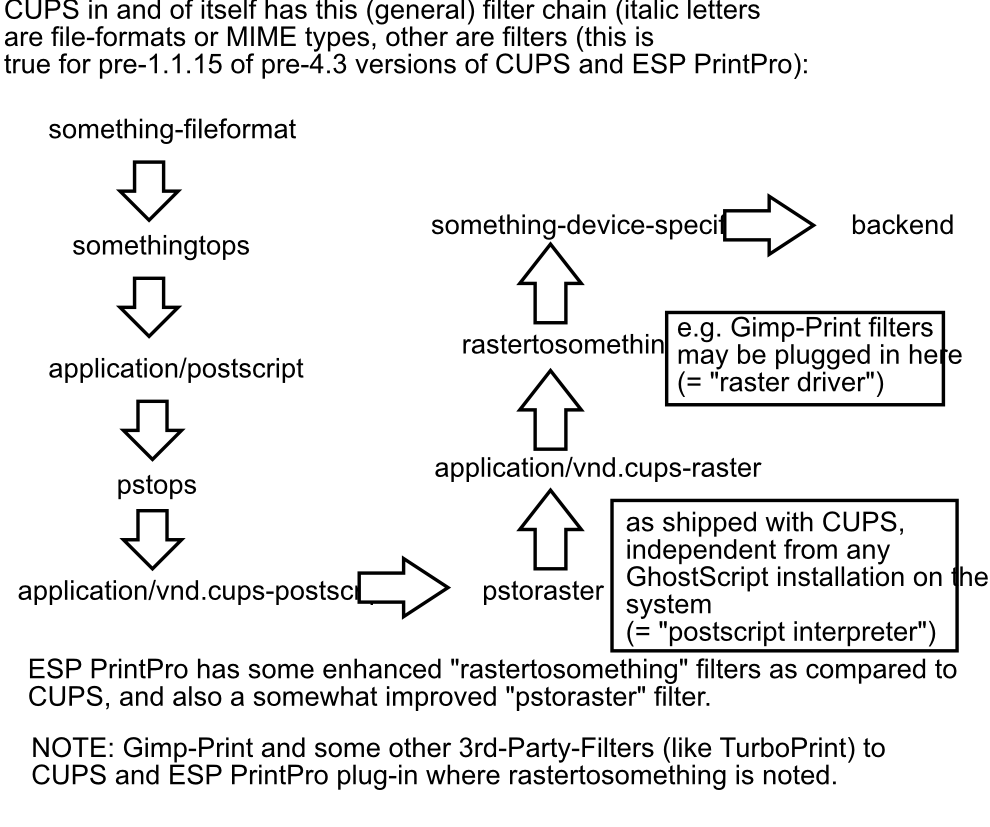
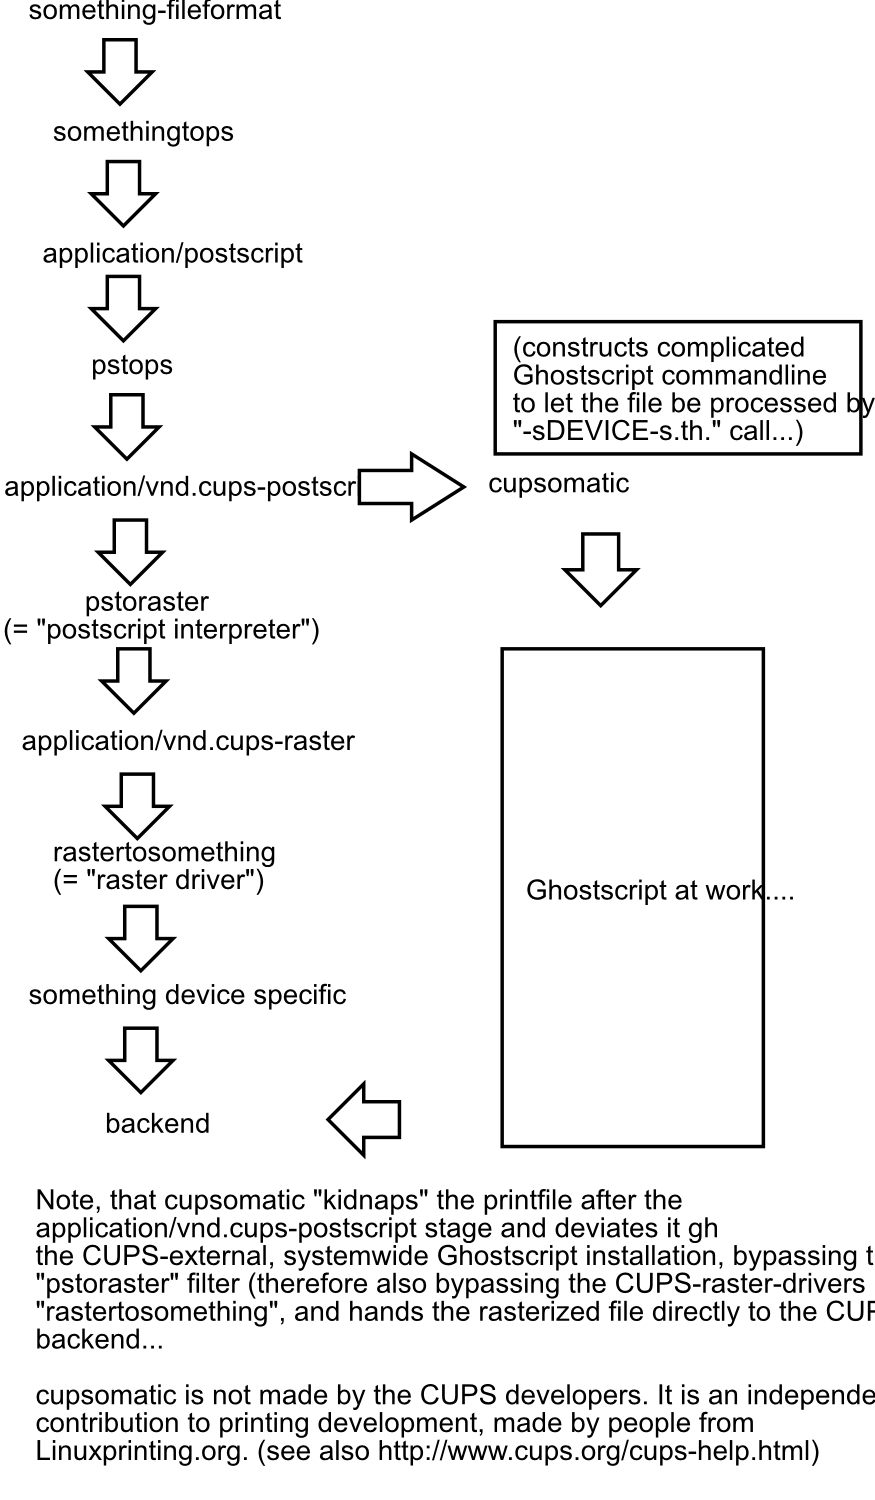
For Windows 9x/Me, clients require the printer names to be eight characters (or “8 plus 3 chars suffix”) max; otherwise, the driver files will not get transferred when you want to download them from Samba.
Have you set security = user? Have
you used smbpasswd to give root a Samba account?
You can do two things: open another terminal and execute
smbpasswd -a root to create the account and
continue entering the password into the first terminal. Or, break
out of the loop by pressing Enter twice (without trying to type a
password).
If the error is “Tree connect failed: NT_STATUS_BAD_NETWORK_NAME”,
you may have forgotten to create the /etc/samba/drivers directory.
If cupsaddsmb, or rpcclient addriver emit the error message
WERR_BAD_PASSWORD, refer to the previous common error.
The use of “cupsaddsmb” gives “No PPD file for printer...” message while PPD file is present. What might the problem be?
Have you enabled printer sharing on CUPS? This means, do you have a <Location
/printers>....</Location> section in CUPS server's cupsd.conf that
does not deny access to the host you run “cupsaddsmb” from? It could be an
issue if you use cupsaddsmb remotely, or if you use it with a -h parameter:
cupsaddsmb -H sambaserver -h cupsserver -v printername.
Is your TempDir directive in
cupsd.conf set to a valid value, and is it writable?
Use smbstatus to check which user
you are from Samba's point of view. Do you have the privileges to
write into the [print$]
share?
Once you are connected as the wrong user (for example, as nobody, which often occurs if
you have map to guest = bad user), Windows Explorer will not accept an
attempt to connect again as a different user. There will not be any bytes transferred on the wire to Samba,
but still you'll see a stupid error message that makes you think Samba has denied access. Use
smbstatus to check for active connections. Kill the PIDs. You still can't re-connect, and
you get the dreaded You can't connect with a second account from the same
machine message as soon as you try. And you do not see a single byte arriving at Samba (see
logs; use “ethereal”) indicating a renewed connection attempt. Shut all Explorer Windows. This
makes Windows forget what it has cached in its memory as established connections. Then reconnect as the right
user. The best method is to use a DOS terminal window and first do net use z:
\\GANDALF\print$ /user:root. Check with smbstatus that you are
connected under a different account. Now open the Printers folder (on the Samba server in
the Network Neighborhood), right-click on the printer in question, and select
.
You see per smbstatus that you are connected as user nobody, but you want to be root or
printer admin. This is probably due to map to guest = bad user, which
silently connected you under the guest account when you gave (maybe by accident) an incorrect username. Remove
map to guest if you want to prevent this.
This information came from a mailing list posting regarding problems experienced when upgrading from Adobe drivers to CUPS drivers on Microsoft Windows NT/200x/XP clients.
First delete all old Adobe-using printers. Then delete all old Adobe drivers. (On Windows 200x/XP, right-click in the background of Printers folder, select , select tab Drivers, and delete here).
Do you use the “naked” root user name? Try to do it
this way: cupsaddsmb -U > (note the two backslashes: the first one is
required to “escape” the second one).DOMAINNAME\\root -v
printername
Deleting a printer on the client will not delete the driver too (to verify, right-click on the white background of the Printers folder, select and click on the Drivers tab). These same old drivers will be re-used when you try to install a printer with the same name. If you want to update to a new driver, delete the old ones first. Deletion is only possible if no other printer uses the same driver.
Local security policies may not allow the installation of unsigned drivers “local security policies” may not allow the installation of printer drivers at all.
Windows XP handles SMB printers on a “per-user” basis.
This means every user needs to install the printer himself or herself. To have a printer available for
everybody, you might want to use the built-in IPP client capabilities of Win XP. Add a printer with the print
path of http://cupsserver:631/printers/printername. We're still looking into this one.
Maybe a logon script could automatically install printers for all users.
For print change, notify functions on NT++ clients. These need to run the Server
service first (renamed to File & Print Sharing for MS Networks in XP).
Windows XP SP1 introduced a Point and Print Restriction Policy (this restriction does not apply to
“Administrator” or “Power User” groups of users). In Group Policy Object Editor, go
to . The policy
is automatically set to Enabled and the Users can only Point and Print to
machines in their Forest . You probably need to change it to Disabled or
Users can only Point and Print to these servers to make driver downloads from Samba
possible.
How are you doing it? I bet the wrong way (it is not easy to find out, though). There are three different ways to bring you to a dialog that seems to set everything. All three dialogs look the same, yet only one of them does what you intend. You need to be Administrator or Print Administrator to do this for all users. Here is how I do it on XP:
The first wrong way:
Open the Printers folder.
Right-click on the printer (remoteprinter on cupshost) and select in context menu
Look at this dialog closely and remember what it looks like.
The second wrong way:
Open the Printers folder.
Right-click on the printer (remoteprinter on cupshost) and select the context menu .
Click on the General tab.
Click on the button
A new dialog opens. Keep this dialog open and go back to the parent dialog.
The third and correct way:
Open the Printers folder.
Right-click on the printer (remoteprinter on cupshost) and select the context menu .
Click on the Advanced tab. (If everything is “grayed out,” then you are not logged in as a user with enough privileges).
Click on the button.
On any of the two new tabs, click on the button.
A new dialog opens. Compare this one to the other identical-looking one from step “B.5” or A.3".
Do you see any difference? I don't either. However, only the last one, which you arrived at with steps
“C.1. to C.6.”, will save any settings permanently and be the defaults for new users. If you want
all clients to get the same defaults, you need to conduct these steps as Administrator
(printer admin in smb.conf) before a client downloads the
driver (the clients can later set their own per-user defaults by following the procedures
A or B).
Don't use Optimize for Speed, but use Optimize for Portability
instead (Adobe PS Driver). Don't use Page Independence: No. Always settle with
Page Independence: Yes (Microsoft PS Driver and CUPS PS Driver for Windows NT/200x/XP).
If there are problems with fonts, use Download as Softfont into printer (Adobe PS
Driver). For TrueType Download Options choose Outline. Use
PostScript Level 2 if you are having trouble with a non-PS printer and if there is a choice.
Symptom: The last command of cupsaddsmb does not complete successfully. If the cmd
= setdriver printername printername result was NT_STATUS_UNSUCCESSFUL, then possibly the printer was
not yet recognized by Samba. Did it show up in Network Neighborhood? Did it show up in rpcclient
hostname -c `enumprinters'? Restart smbd (or send a kill -HUP to all processes
listed by smbstatus, and try again.
Have you ever by accident set the CUPS spool directory to the same location (RequestRoot
/var/spool/samba/ in cupsd.conf or the other way round:
/var/spool/cups/ is set as path> in the [printers] section)? These must be different. Set RequestRoot
/var/spool/cups/ in cupsd.conf and path =
/var/spool/samba in the [printers] section of smb.conf. Otherwise,
cupsd will sanitize permissions to its spool directory with each restart and printing will not work reliably.
In this case a print queue called “lp” intermittently swallows jobs and spits out completely different ones from what was sent.
It is a bad idea to name any printer “lp”. This is the traditional UNIX name for the default
printer. CUPS may be set up to do an automatic creation of Implicit Classes. This means, to group all printers
with the same name to a pool of devices and load-balance the jobs across them in a round-robin fashion.
Chances are high that someone else has a printer named “lp” too. You may receive that person's
jobs and send your own to his or her device unwittingly. To have tight control over the printer names, set
BrowseShortNames No. It will present any printer as
printername@cupshost, which gives you better control over what may happen in a
large networked environment.
Use smbclient to connect to any Windows box with a shared PostScript printer:
smbclient //windowsbox/print\$ -U guest. You can navigate to the
W32X86/2 subdir to mget ADOBE* and other files or to
WIN40/0 to do the same. Another option is to download the *.exe
packaged files from the Adobe Web site.
A complete overview of the CUPS printing processes can be found in the CUPS Printing Overview diagram.